Step-by-step guides on how to get all of your Assessment tasks accomplished.
Assessment Search is The City’s online assessment resource for you to use anytime and anywhere. This page provides you with detailed steps for accessing and using the many tools and resources offered within Assessment Search.
Note: Property Tax information (including tax bills) is not available on Assessment Search. Visit Property Tax or contact Tax for property tax information.
We encourage property and business owners to login to Assessment Search through Secure Access. While limited information can be accessed publicly, more detailed information, tools, and account management features can be accessed by logging in. Visit Create your account to learn more. Once you’ve completed the necessary steps, you will be able to login to Assessment Search through Secure Access and:
How-to guides for reviewing your property value
You can review your property and/or business information anytime by viewing the Property/Business Detail report. These reports contain important and detailed information, including the characteristics used to prepare your most recent assessment. This report is confidential and viewable only to you, the property/business owner.
Step 1. Log into Assessment Search through Secure Access.
Note: If this is your first-time logging into Assessment Search, you will need to register for a myID account and link your property’s roll number to your account. Visit Create your account for step-by-step instructions
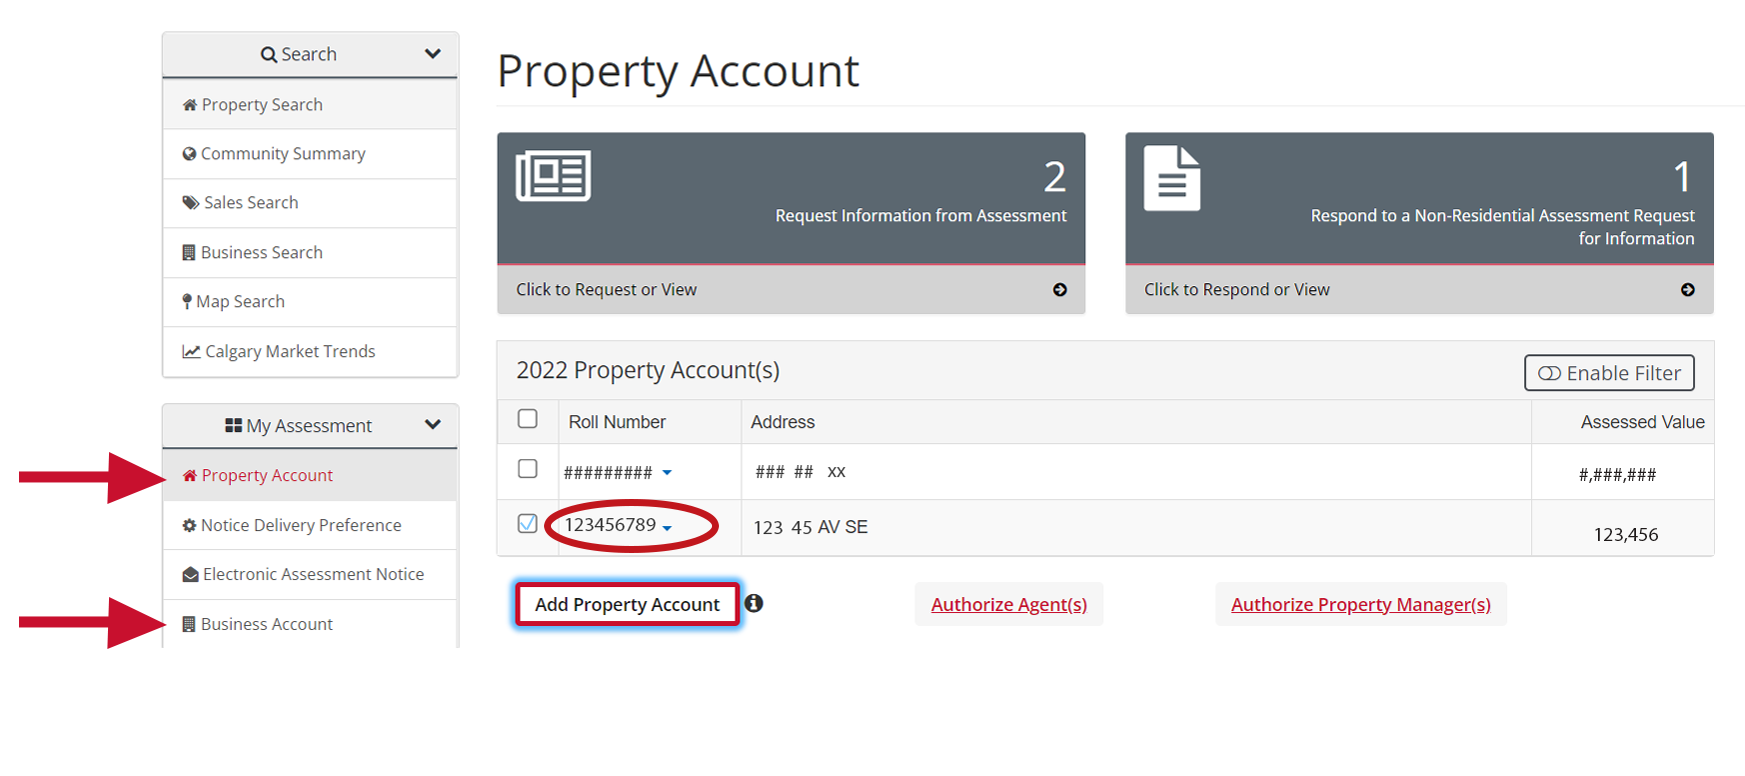
Step 2. a) For customers looking to access their Property Detail report: Navigate to the Property Account page by clicking on the corresponding button on the left-hand navigation panel. This will bring you to the Property Account page where will see your property account(s) listed. Click on the hyperlinked roll number found under the Roll Number header.
b) For customers looking to access their Business Detail report: Navigate to the Business Account page by clicking on the corresponding button on the left-hand navigation panel. This will bring you to the Business Account page where will see your business account(s) listed. Click on the hyperlinked business identified found under the Business Identifier (BID) header.

Step 3. A dropdown list will appear. Select Property Detail (or Business Detail, if applicable). This will download your report where you can review your property or business information.

Note: If you need to update any property information after reviewing your Property Detail report, please review the applicable sections of this how-to guide for updating residential and non-residential property information.
If you need to update any business information after reviewing your Business Detail report, we encourage you to contact Assessment.
You can update your residential property information on an annual basis. We encourage you to complete this review annually even if your property information is up to date, as this helps us know that your property information is current.
Complete your residential property update by following the steps below.
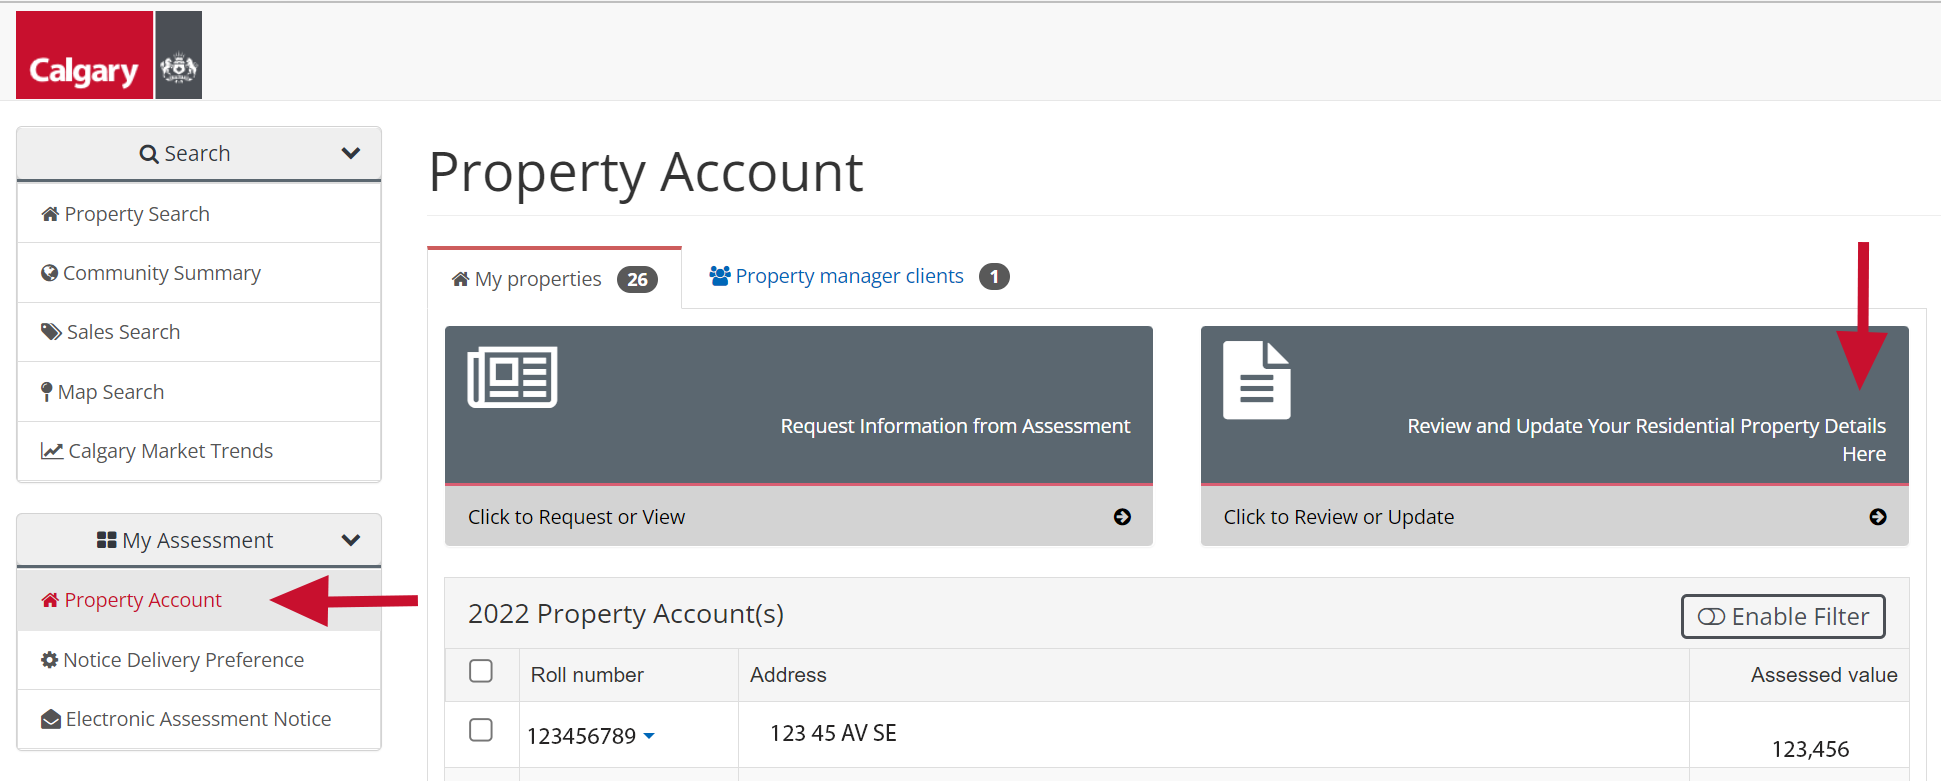
Step 1. Log into Assessment Search through Secure Access and navigate to the Property Account page by clicking on the corresponding button on the left-hand navigation panel.
Note: If this is your first-time logging into Assessment Search, you will need to register for a myID account and link your property’s roll number to your account. Visit Create your account for step-by-step instructions
Step 2. At the top of the Property Account page, click Review and Update Your Residential Property Details Here. Note that this button will only appear if you have a residential property(ies) linked to your account, and you have not yet completed the update(s) for this year. If you need to make changes to your residential property information and this option is not available to you, we encourage you to Contact Assessment.
Step 3. The residential property(ies) you can update will be listed. Click the Review / Update button next to the property you are updating.
Note: If you have already completed the update, the button will say View. This will allow you to review the information you submitted.
Step 4. A summary page of the property will appear. Detailed information is provided in the grey box at the top of the page. After reading the information provided, click Next.
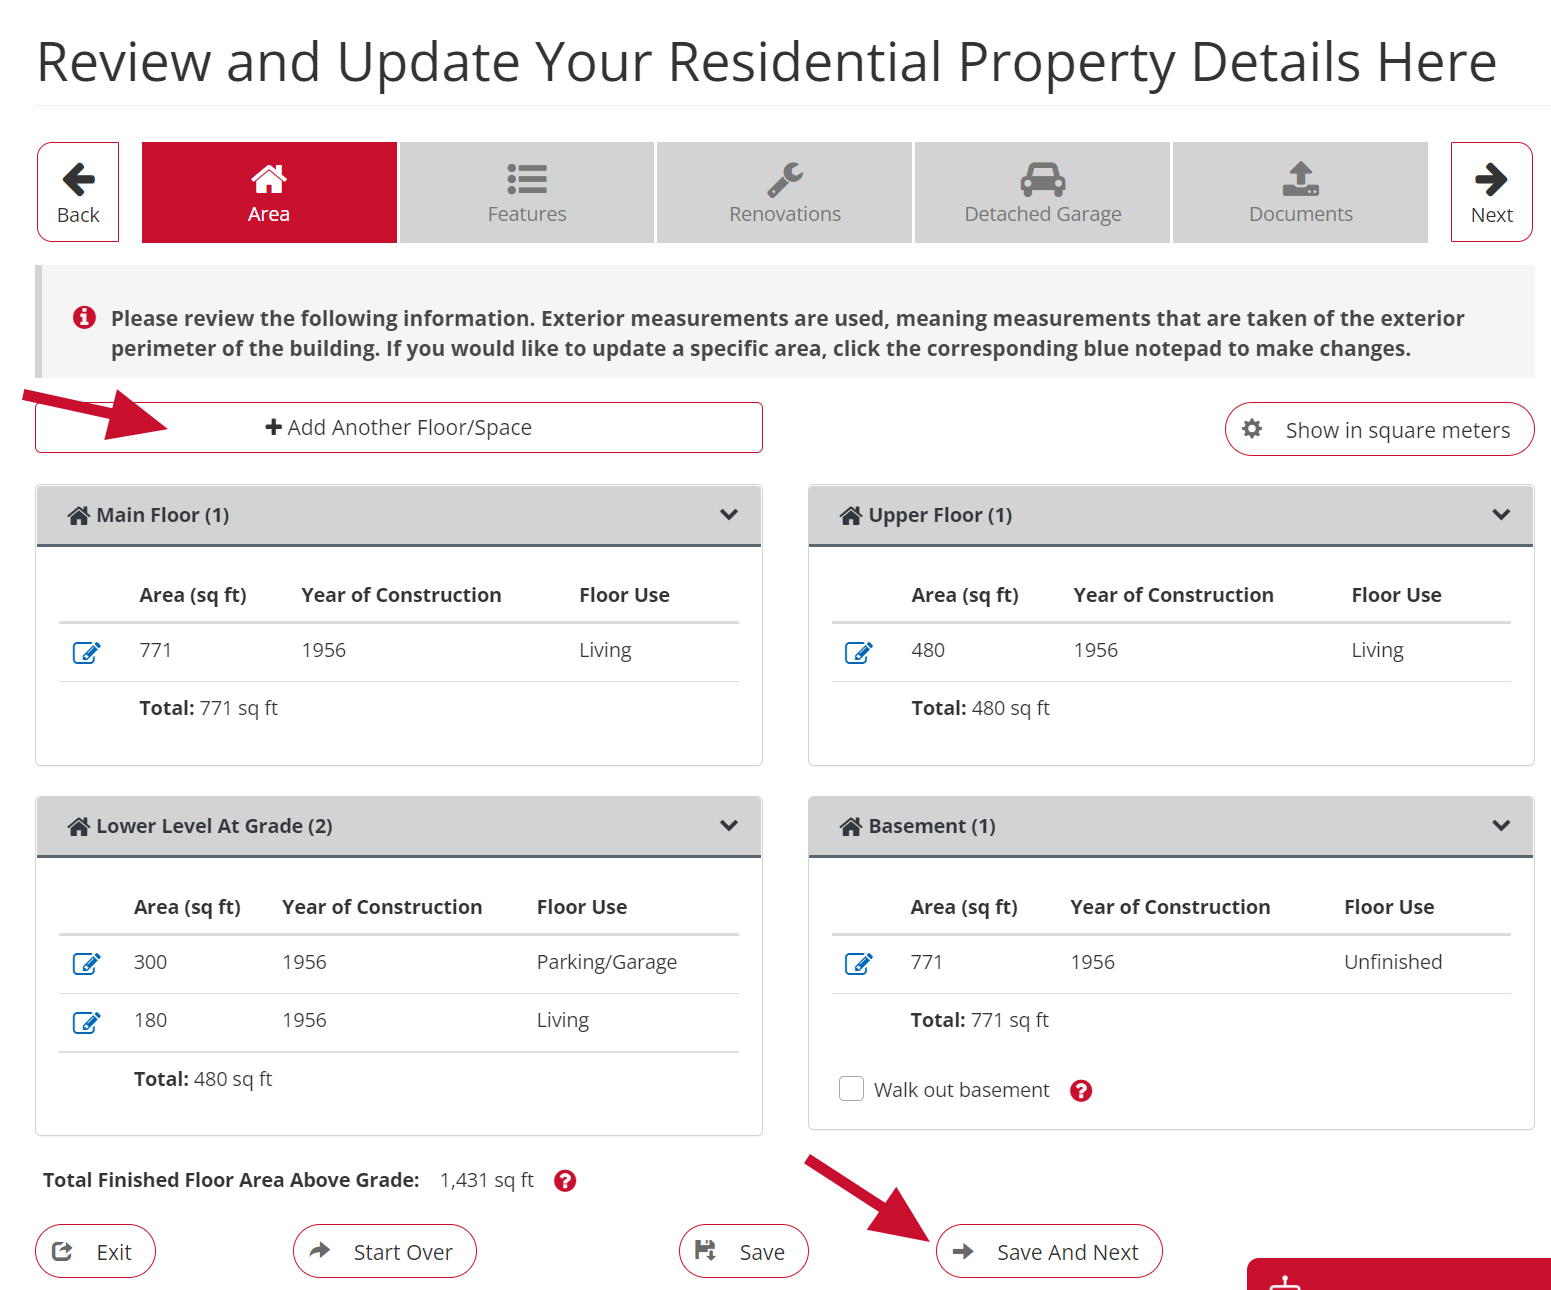
Step 5. Review the Area(s) of your property. If you need to make changes to an existing area, click the blue icon within the applicable floor. A popup will appear which you can populate with your changes.
If you need to add an area, click Add Another Floor/Space. A popup will appear which you can populate with your changes.
When you have finished updating the Area page, click Save And Next.
Note: For all pages, you can hover over any of the red question mark symbols at any time to learn more about the related term. You can also download the glossary of terms linked at the bottom of each page to learn more.
Step 6. Review the Features of your property and make any changes needed. Once you have finished, click Save And Next to continue to the next section.
Step 7. Continue to review and update the following pages, Renovations and Detached Garage, as needed. Remember to read any information provided at the top of each section.
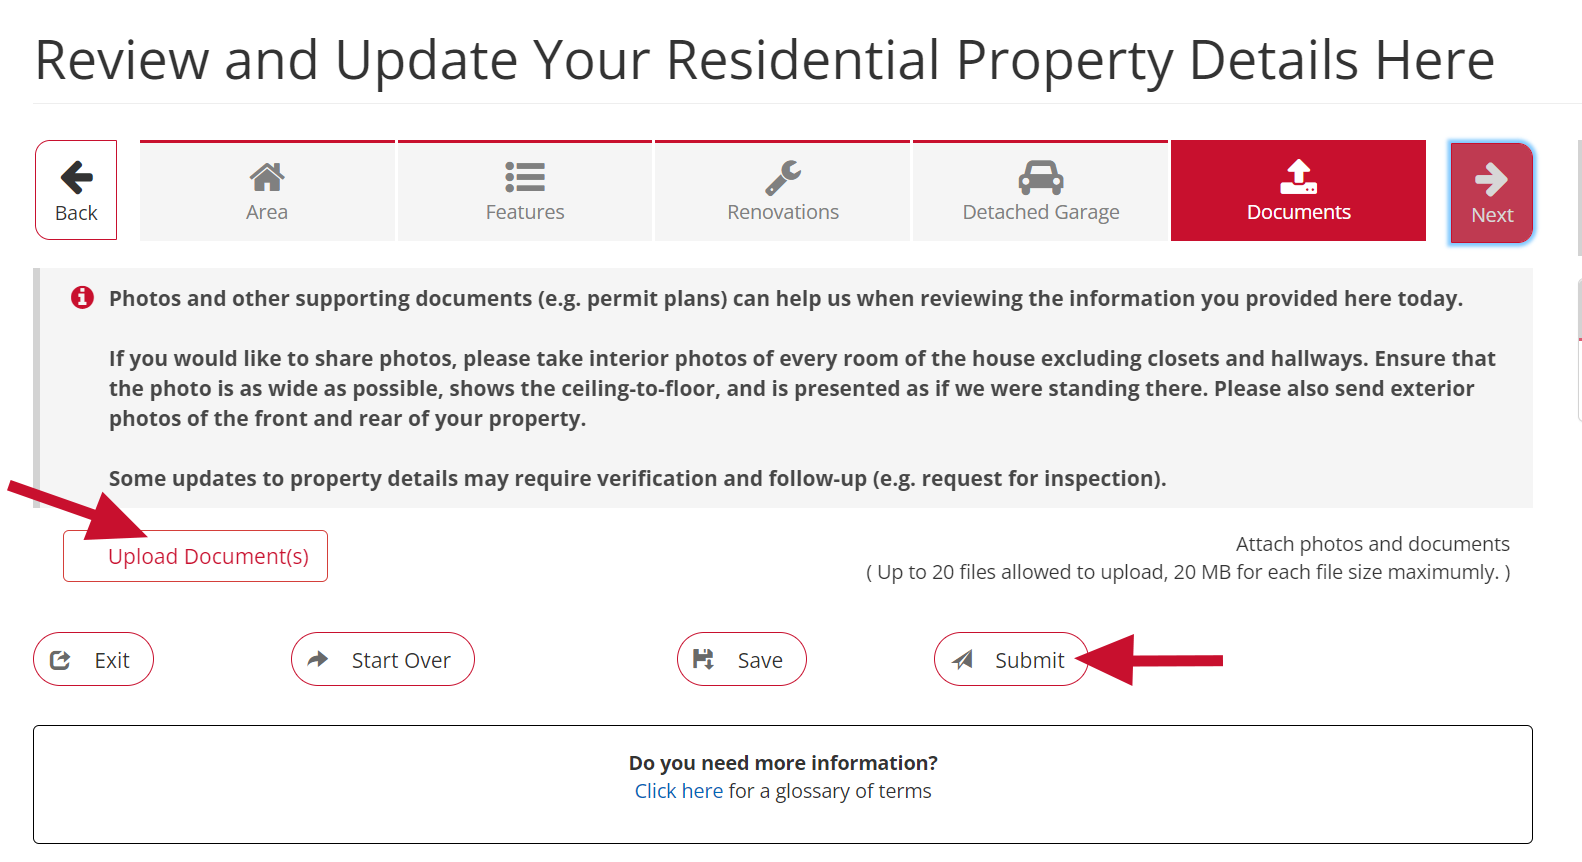
Step 8. In the last page of the update, Documents, you will have the opportunity to upload any helpful documents that you would like to share. Follow the instructions provided. Once you have finished uploading the documents, or if you do not have any documents to provided, click Submit.
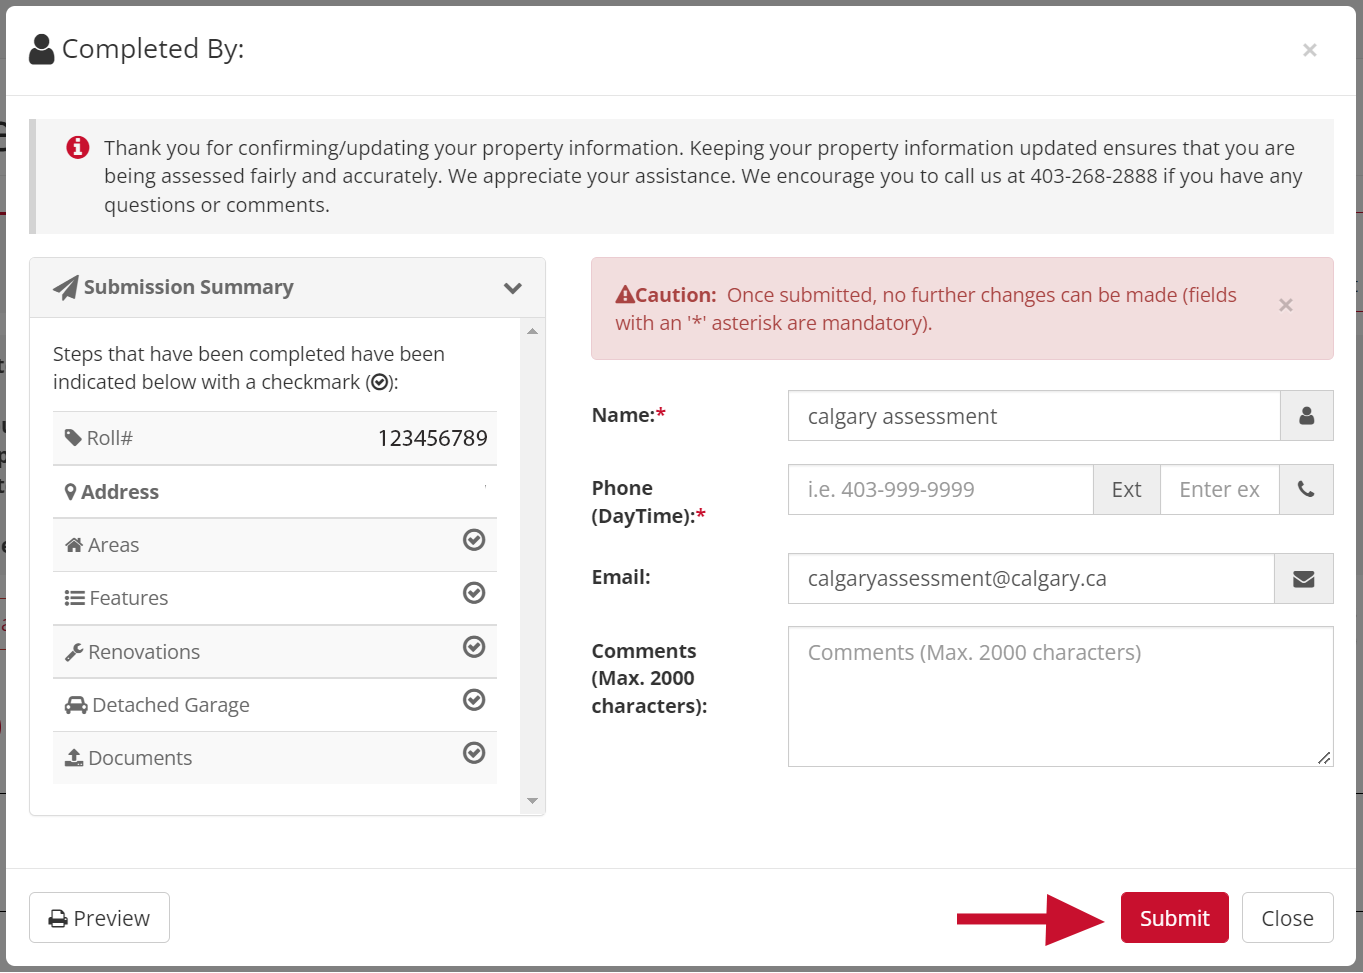
Step 9. A popup box will appear. Populate the information to tell us who completed the updated. You can also add any comments that you think would be helpful.
Step 10. Click Submit. A message will appear noting that your information has been submitted successfully.
Most non-residential property owners (or their authorized property managers) can respond to an ARFI online. Some property types (e.g., multi-residential) require submission by another format.
Step 1: Log into Assessment Search through Secure Access and navigate to the Property Account page by clicking on the corresponding button on the left-hand navigation panel.
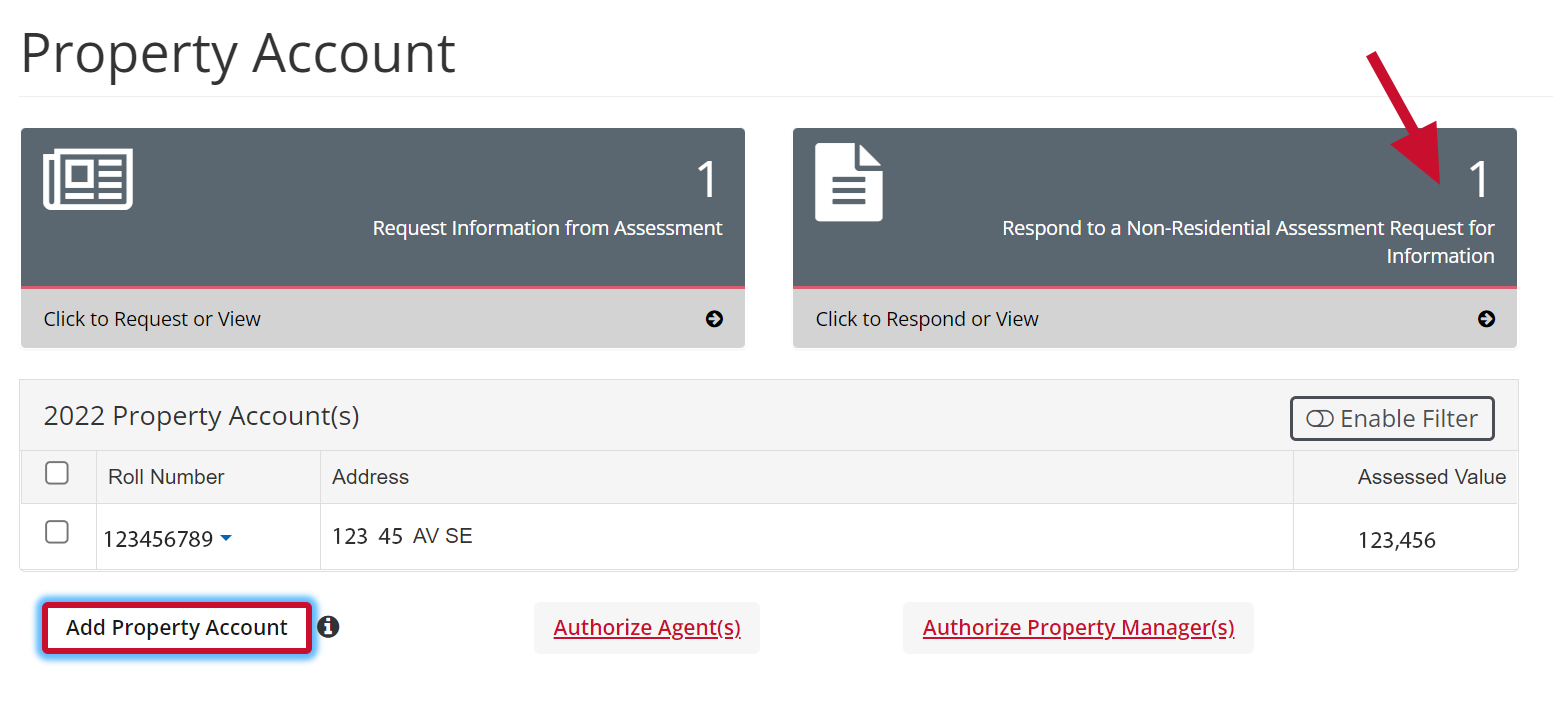
Step 2: At the top of the Property Account page, click Respond to a Non-Residential Assessment Request for Information. Note that this button will only appear if you have a non-residential property(ies) with a related ARFI linked to your account. If you need to make changes to your non-residential property information and this option is not available to you, or you need to make changes to a submitted ARFI, we encourage you to Contact Assessment.
Step 3: The non-residential ARFIs you can respond to will be listed. Click the Respond button next to the property you are submitting information for.
Note: If you have already submitted the ARFI, the button will say View. This will allow you to review the information you submitted.

Step 4: An ARFI Summary page will appear. Review the Compliance Information and select Continue to proceed. This will bring you to a summary of the property.
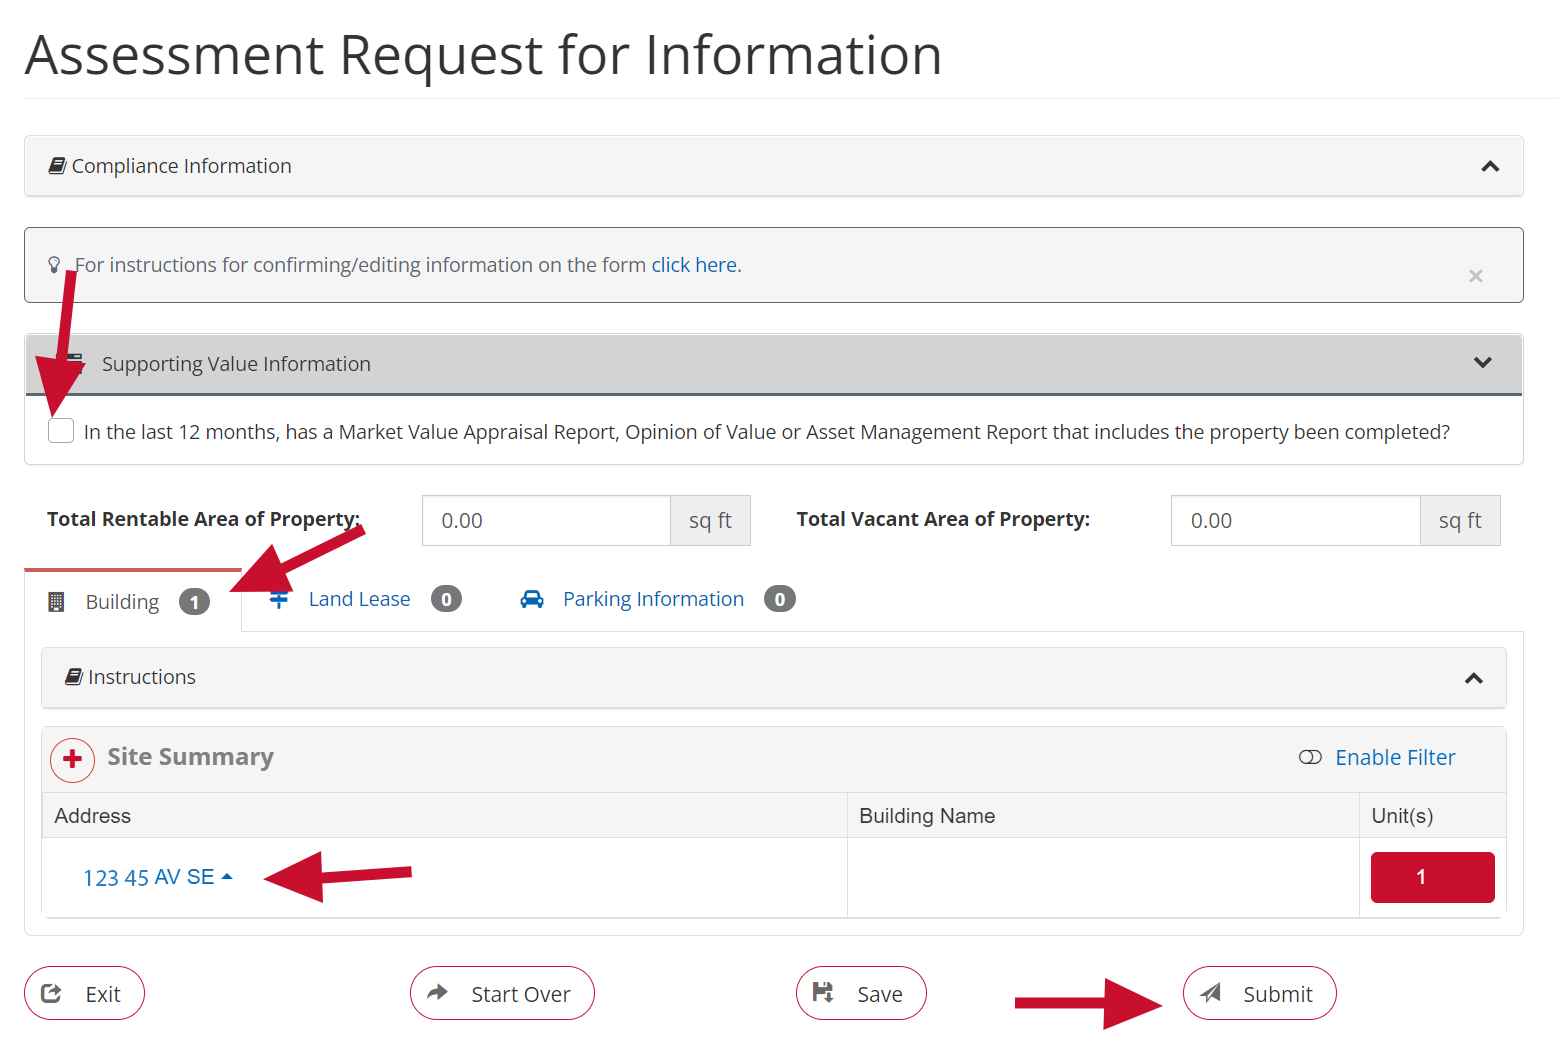
Step 5: If applicable, check off the box under Supporting Value Information to tell us if a Market Value Appraisal Report, Opinion of Value or Asset Management Report that includes the property has been completed last 12 months.
Step 6: Review the information provided under the Building tab.
Step 7: Review the unit(s) by clicking on the hyperlinked address or the red button beneath the Unit(s) header.
Note: If you attempt to submit without completing the unit review, you will be given a message noting submission failure because you have not reviewed each building and its associated units.
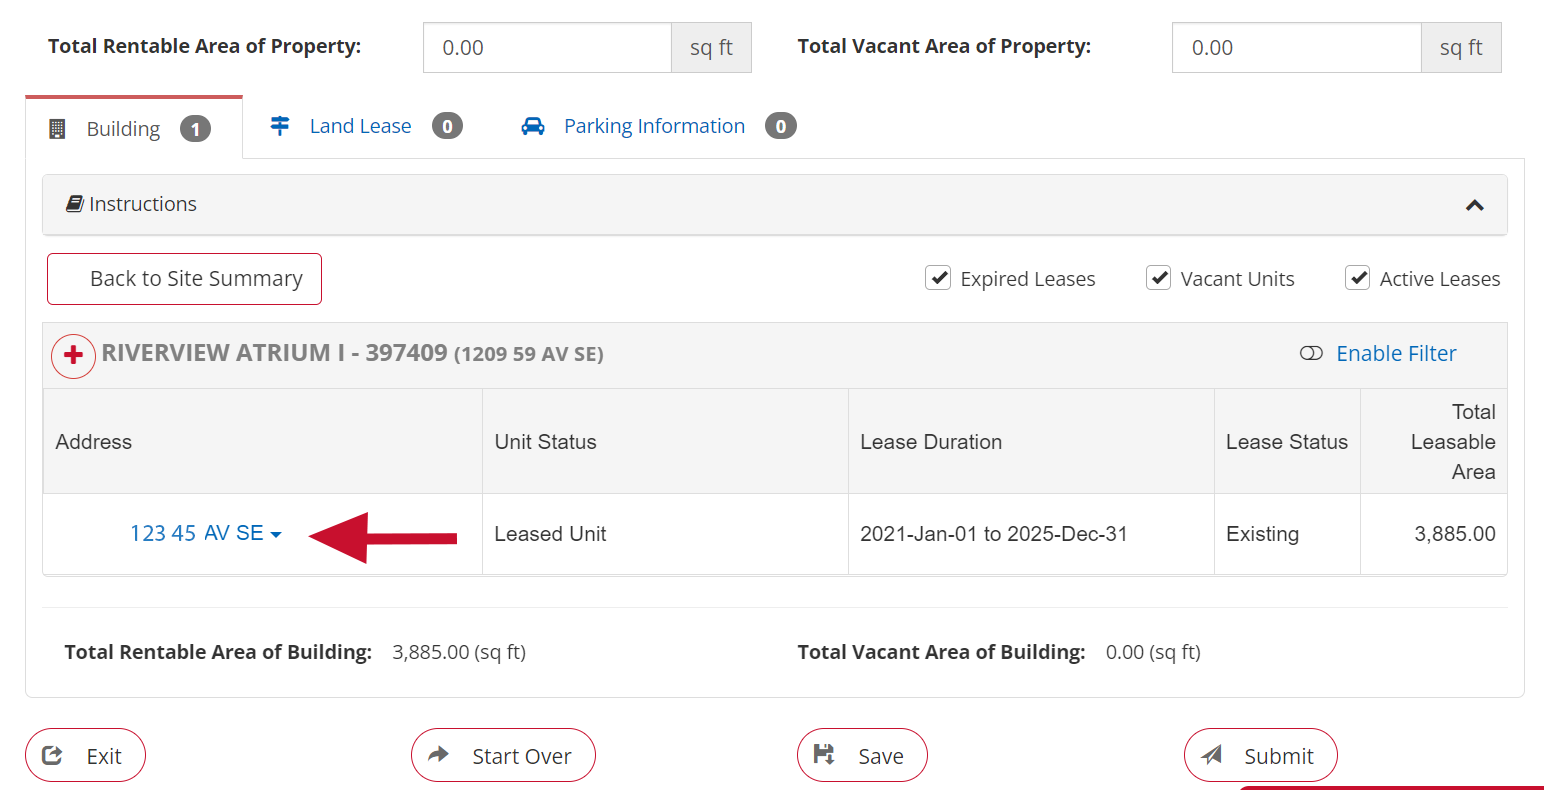
Step 8: A list of the building’s unit(s) will appear. To edit a unit’s information, including any related lease information, select the hyperlinked address. A Unit Lease Wizard popup will appear where you can edit the unit information. Save your changes before proceeding.
Note: If the building has more than 10 units, you can upload the rent roll. For accounts with 10 units or less, you will need to use the grid provided to verify or update lease information.
Step 9: Once you have completed your reviewing of the Building tab and its associated unit, review the information provided under the Land Lease and Parking Information tabs. Update information as needed.
Step 10: Once you have reviewed the information and made any necessary updates, click Submit.
Step 11: An Acknowledgement and Certification popup box will appear. Read the information and then select Acknowledge to continue.
Step 12: A message will appear noting that the ARFI has been submitted successfully.
Non-residential and multi-residential property owners and their agents can submit an online Assessment Information Request (AIR).
The purpose of the Assessment Information Request (AIR) form is for an assessed person and/or their authorized agent, to request, under Section 299 of the Municipal Government Act, information about how the assessor prepared the assessment of the assessed person’s property that may not be available on The City of Calgary Assessment website.
The purpose of this online form is also for an assessed person and/or their authorized agent to request, under Section 300 of the Municipal Government Act, summary assessment information on other assessed properties (to a maximum of 5) that may not be available on The City of Calgary website or through Assessment Search.
Note: Visit Understand Calgary’s Market to learn how to access Calgary Market Trends reports.
To submit an Assessment Information Request:
Step 1. Log into Assessment Search through Secure Access and navigate to the Property Account page by clicking on the corresponding button on the left-hand navigation panel.
Note: If this is your first-time logging into Assessment Search, you will need to register for a myID account and link your property’s roll number to your account. Visit Create your account for step-by-step instructions
Step 2. Click Request Information from Assessment.

Step 3. You will be redirected to the Request Information from Assessment page. Click Request for the property you are requesting information for.

Step 4. A form will appear. Complete the request by populating the required fields for each dropdown section. Click Next to proceed to the next dropdown section. Note any requests that have associated fees.
Step 5. When all fields have been completed, click Submit.
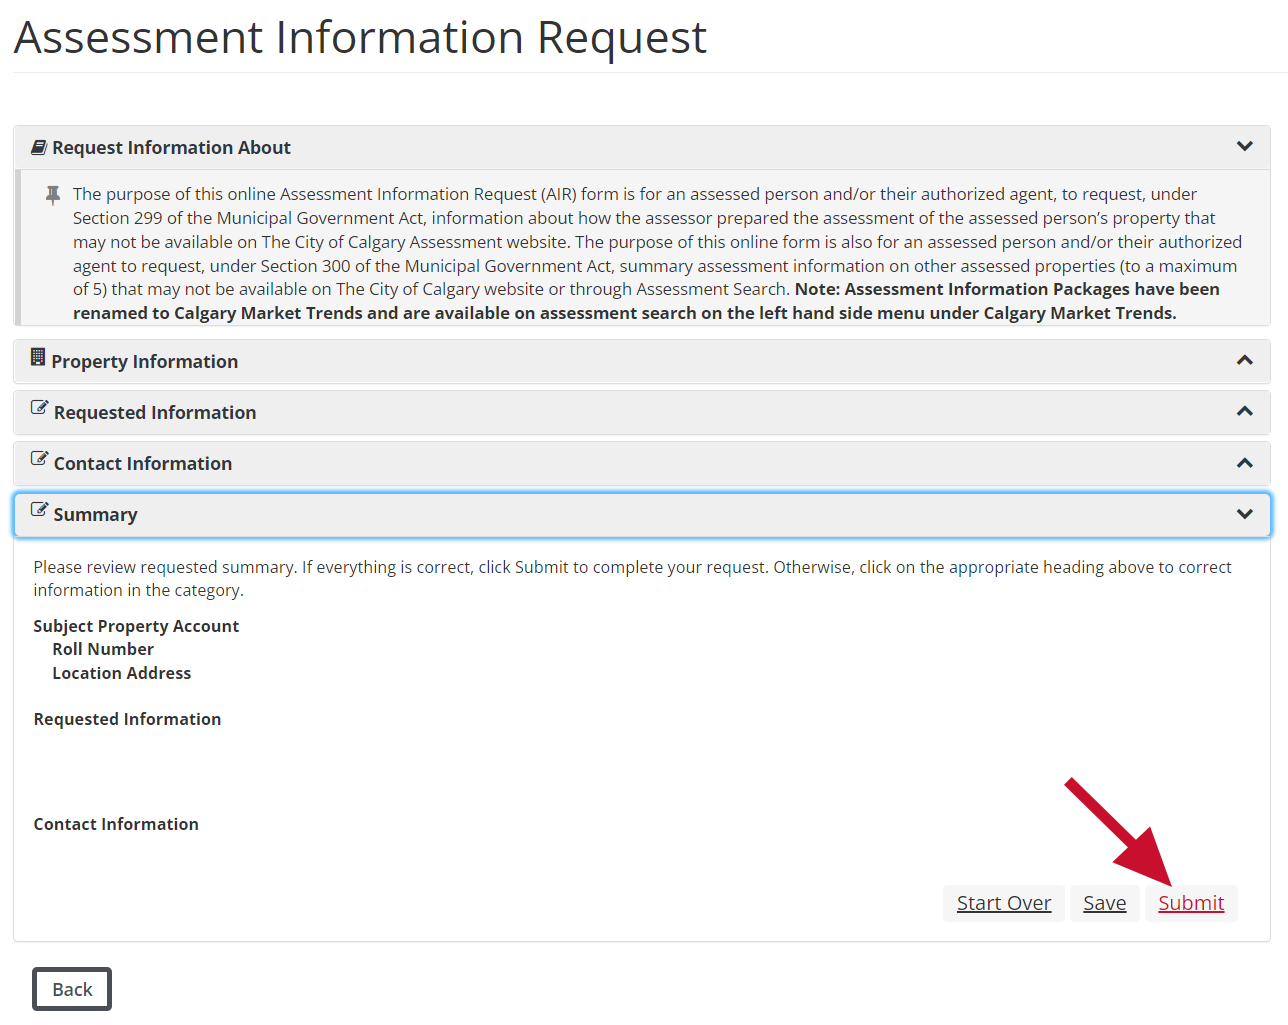
Step 6. An Acknowledgement and Certification popup box will appear. Read the information and then select Acknowledge and Certify to continue.
Step 7. A summary of your submission will appear which will confirm you successfully submitted the request.
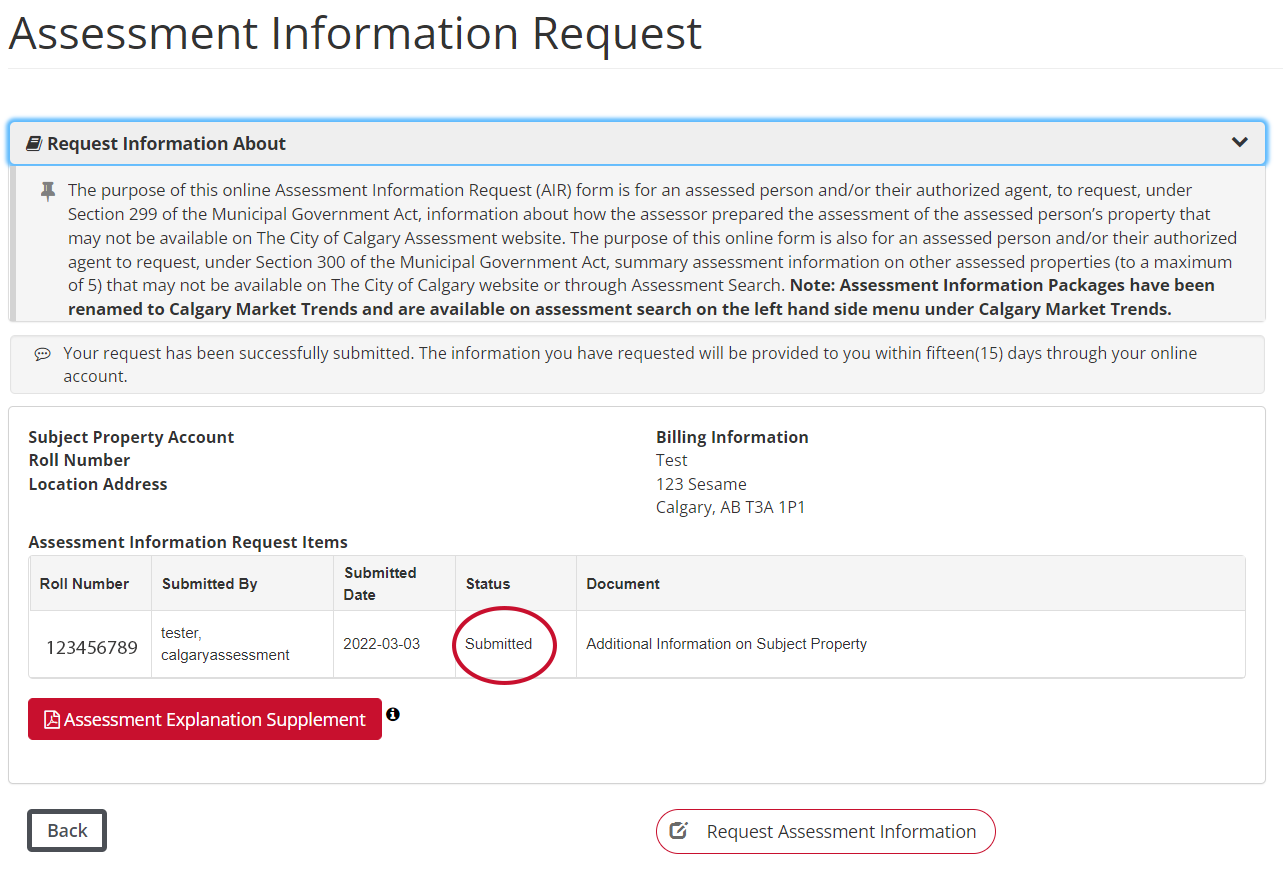
Step 8. Once the Assessment Information Request has been processed by Assessment, you can review the information by following Steps 1 - 2 outlined above.
Step 9. You will be redirected to the Request Information from Assessment page. Click Request / View for the property you submitted an Assessment Information Request for. Once Assessment has processed the request and it is ready for your viewing, the Request / View button will turn green. Once you have viewed the information, the button will revert to the white/red colour to indicate that you have seen it.

Assessment Complaints must be filed and managed through the Assessment Review Board (ARB). Please see the Assessment Review Board website at CalgaryARB.ca to learn more.
Assessment Search cannot be used to file Assessment complaints or submit evidence for Tribunal hearings.
Once a complaint is filed with the Calgary Assessment Review Board (ARB), any evidence disclosure must be provided to both the ARB and Assessment according to the disclosure deadlines outlined on the Notice of Hearing. A Notice of Hearing is sent to the Complainant once a hearing has been scheduled by the ARB, and will provide information about submitting evidence online through the Evidence Disclosure Portal (EDP) and/or in-person. EDP will provide copies of Complainant evidence to both the Respondent (The City of Calgary) and ARB administration for hearing Panel members.
An individual or company is permitted to act as a representative/authorized agent for an assessed person in interactions with The City of Calgary associated with the annual assessment process. Visit Authorize an agent to learn more.
Note: You will need your agent’s Business Administrator myID username to proceed with the authorization process.
Authorize an agent to represent your property or business by following the steps below:
Step 1: Log into Assessment Search through Secure Access.
Step 2:
a) For customers looking to authorize an agent to represent their property: Navigate to the Property Account page by clicking on the corresponding button on the left-hand navigation panel.
b) For customers looking to authorize an agent to represent their business: Navigate to the Business Account page by clicking on the corresponding button on the left-hand navigation panel.
Step 3: Select the property(ies) or business(es) you want to add an agent to.
Step 4: Click Authorize Agent(s).
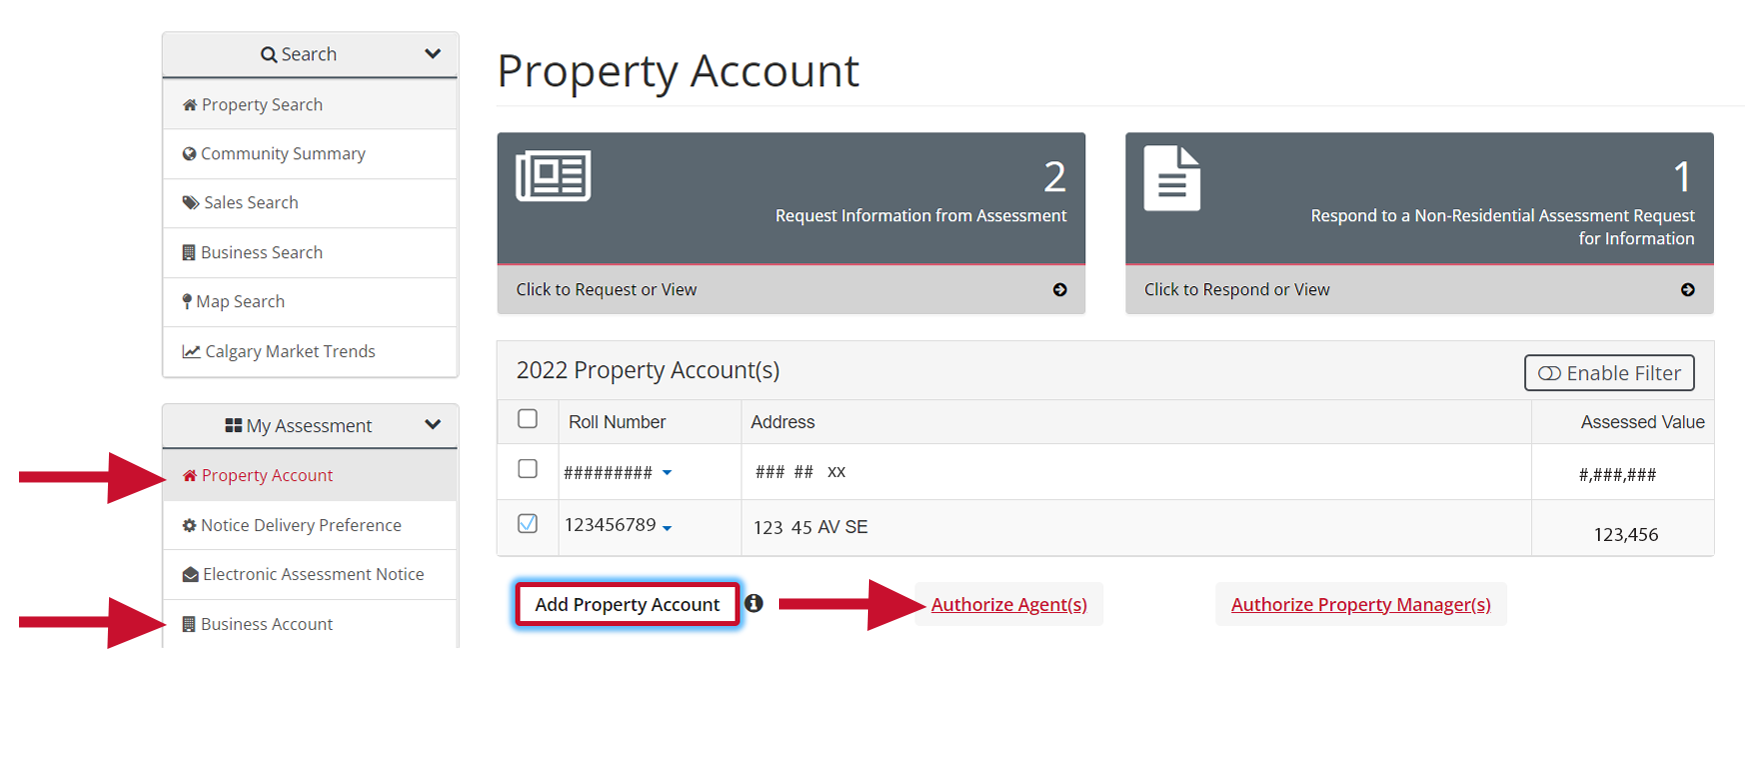
Step 5: The Authorize Agent popup box will appear.
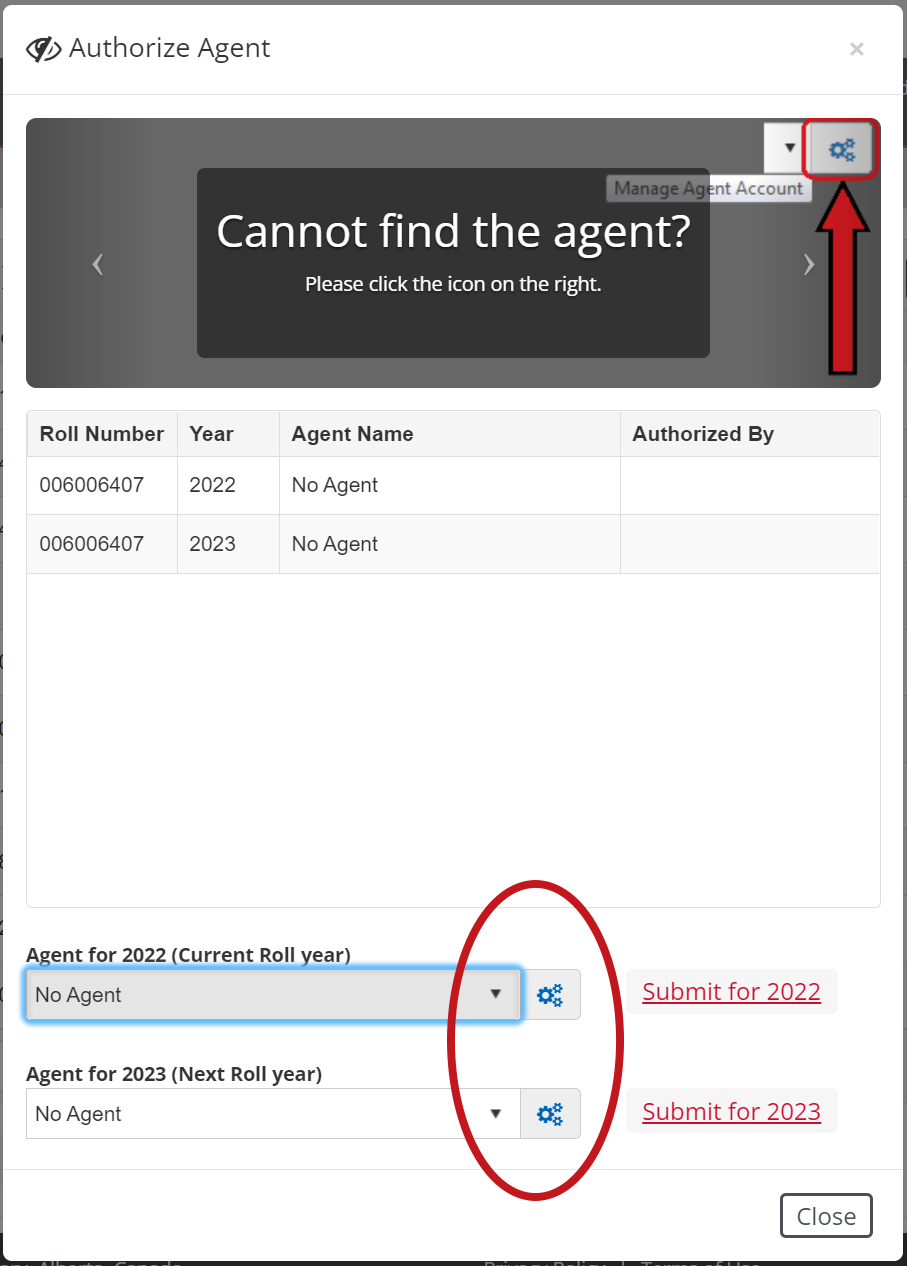
a) If you have previously added the applicable agent to your account, then continue to step 5c.
b) If this is your first time adding the applicable agent to your account, then the agent’s name will not be listed in the dropdown. You will need to add the agent to your agent list before proceeding.
c) Select the agent from the drop-down menu for the applicable roll year and click Submit for 20XX
d) An Acknowledgement and Certification popup box will appear. Read the information and then select Acknowledge and Certify to continue.
e) A message will appear noting that the authorization update has been completed. The agent authorization will also be listed.
Note: You can authorize the same agent for multiple roll years and multiple properties (roll numbers) or businesses (business identifiers) at one time. If you are authorizing different agents to each property or business, you will need to complete this step separately for each property/business.
Step 6: If you would like to remove an agent’s authorization for a property or business, follow Steps 1 – 4. The Authorize Agent popup box will appear. Select No Agent from the drop-down menu (as pictured in Step 5) for the applicable roll year and click Submit for 20XX.
Step 7: You will be asked to confirm that you want to de-authorize all agents for the property/business and roll year you selected. Click Yes. A message will appear confirming that that authorization update is complete.
How to guides for comparing property values in Calgary
Use the Property Search tool to access summary assessment information on properties in Calgary. Compare your property assessment to similar properties (those that have similar characteristics and are in a similar location) to review your market value for fairness and equity.
Note: If you are looking to research other businesses as you are an owner of a business located in a Business Improvement Area, you can follow the same steps below using the Business Search tool instead of the Property Search tool.
Step 1. Log into Assessment Search through Secure Access and navigate to the Property Search page by clicking on the corresponding button on the left-hand navigation panel.
Note: If this is your first-time logging into Assessment Search, you will need to register for a myID account and link your property’s roll number to your account. Visit Create your account for step-by-step instructions
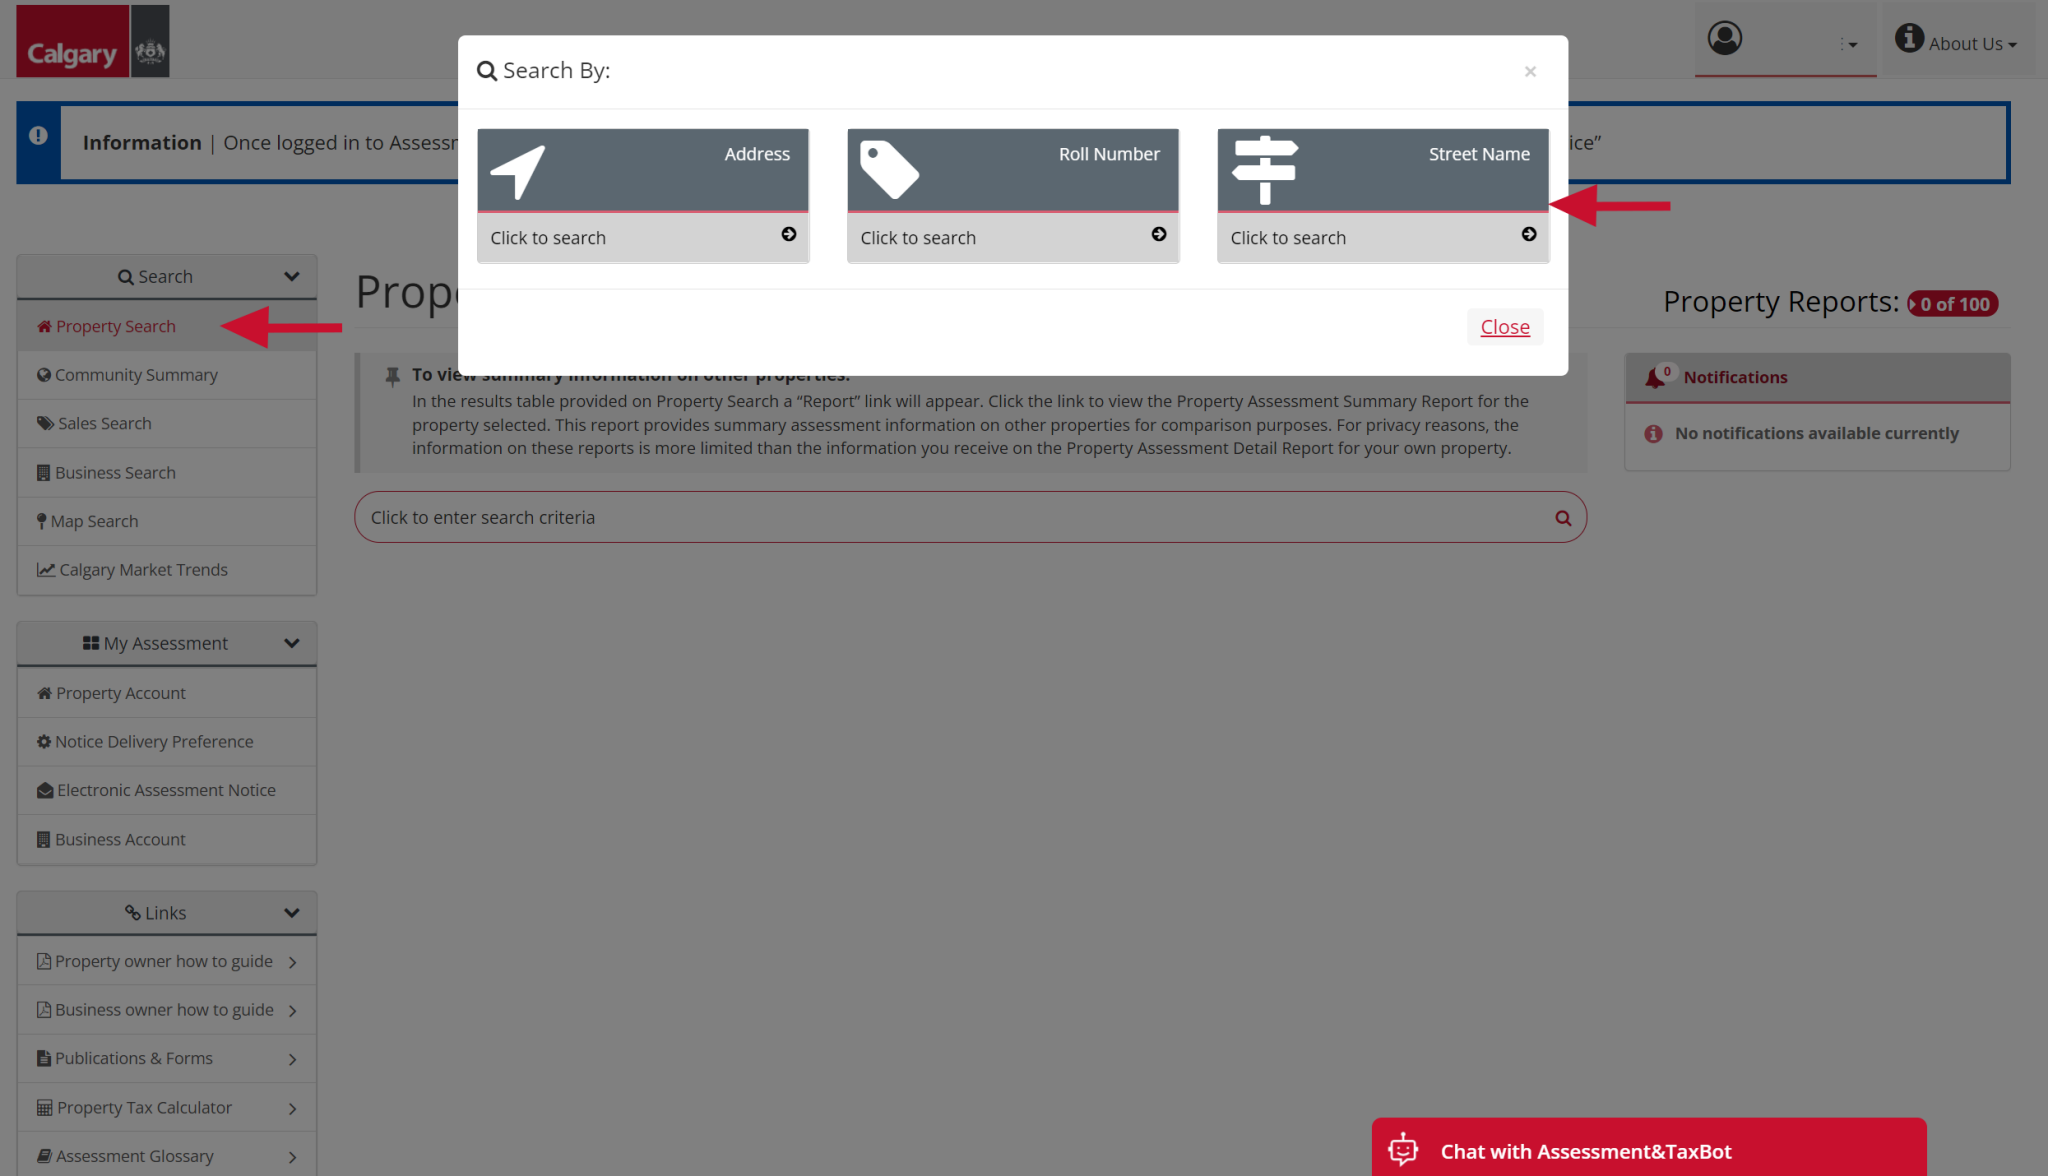
Step 2. A popup will appear. If the popup does not appear, select Click to enter search criteria.
Step 3. Using the Property Search function, you can search by address, roll number, or street name by using the buttons provided.
Step 4. After performing the search, a listing of properties will be displayed. Click the hyperlinked address to download the Property Summary Report. This report includes information such as the year of construction, its square footage and many other characteristics used to prepare the assessment.
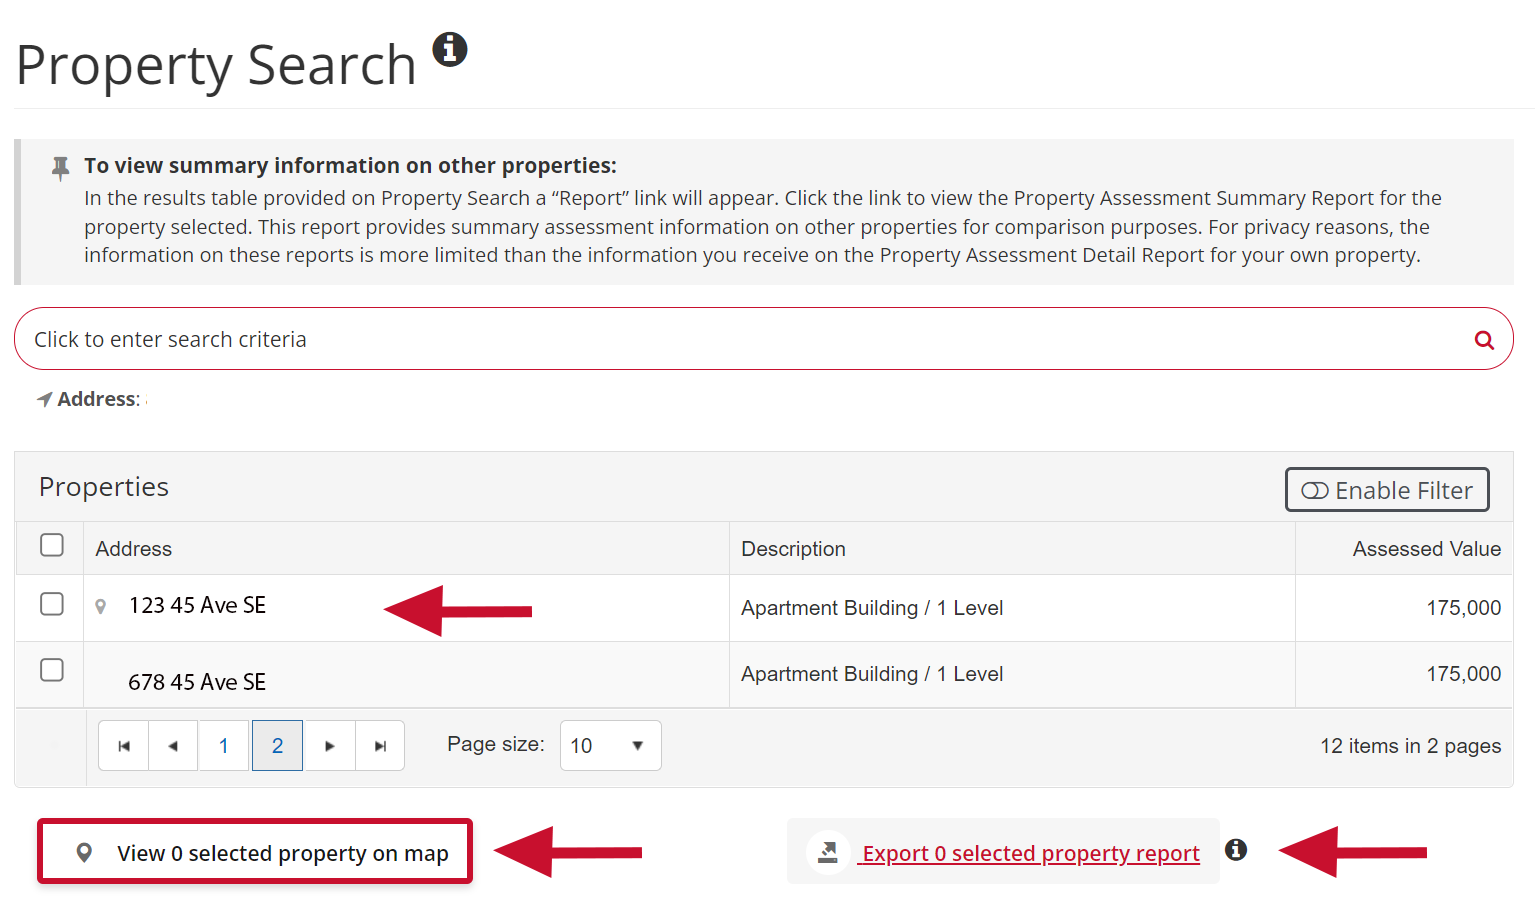
If you would like to view the property(ies) on a map, check off the properties that you would like included and then click View X selected properties on map. This will redirect you to the Map Search functionality.
If you would like to download the Property Summary Report for multiple properties at one time, check off the properties that interest you and then click Export X selected property reports. The selected Property Summary Report(s) will be downloaded. Note that you can also download individual Property Summary Reports in this way, as an alternative to clicking the hyperlinked address.
Note: You can access up to 50 Property or Business Summary Reports each year, per roll number. For example, if you have two roll numbers, you can access up to 50 reports per roll number, giving you a combined total of 100 reports. You can request additional report views if needed by completing and submitting this form.
Community Summary is a tool made available for accounts with linked properties (i.e., roll numbers). It enables community comparisons on median assessment values, along with increases or decreases in revenue neutral taxes. A community profile is provided for each Calgary community. The profiles are separated into two categories: single residential and residential condominiums.
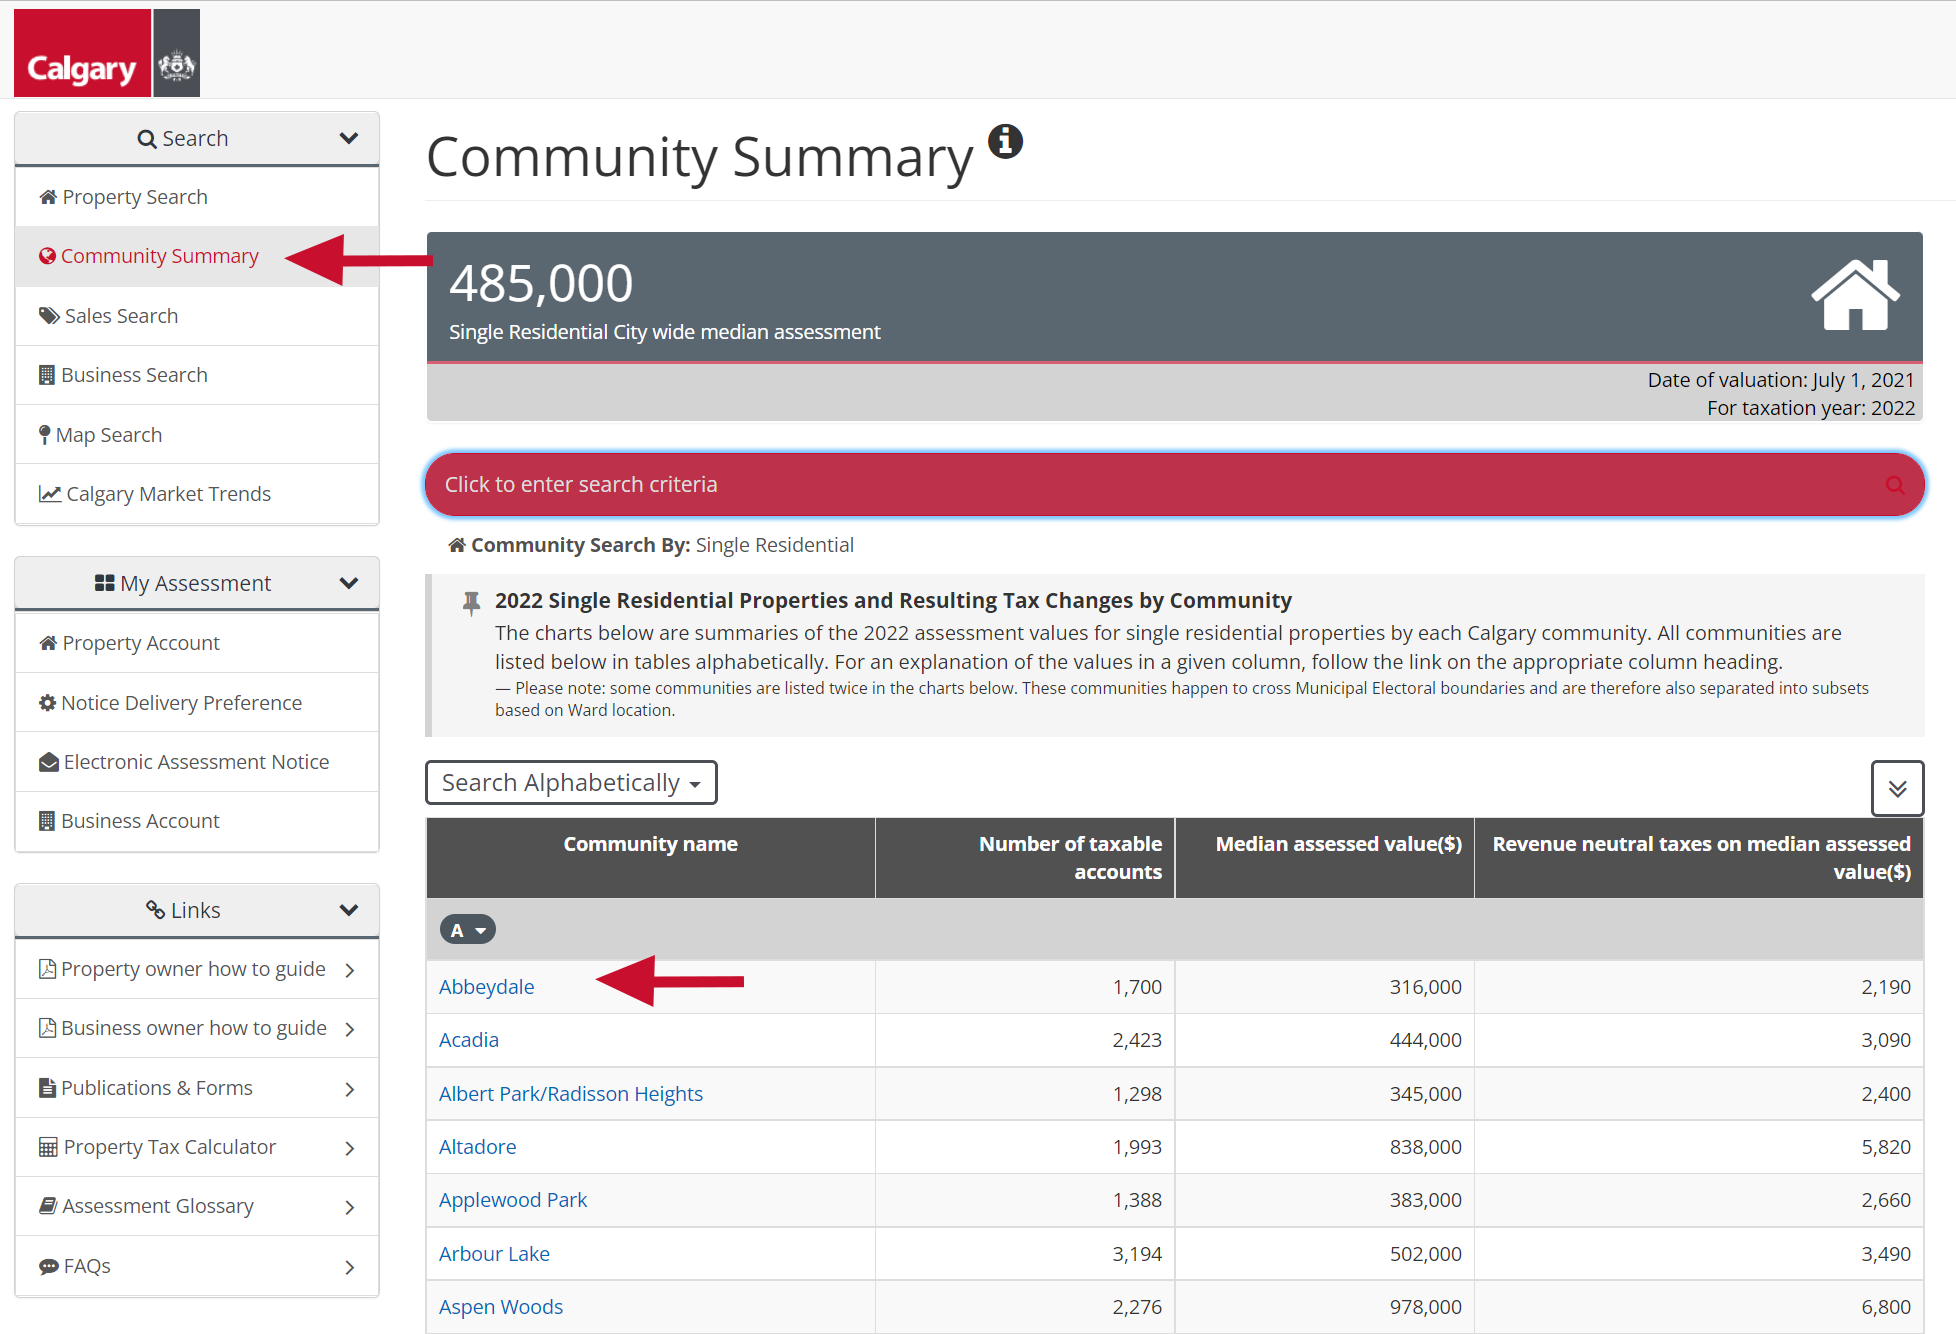
Step 1. Log into Assessment Search through Secure Access and navigate to the Community Summary page by clicking on the corresponding button on the left-hand navigation panel.
Note: If this is your first-time logging into Assessment Search, you will need to register for a myID account and link your property’s roll number to your account. Visit Create your account for step-by-step instructions
Step 2. A popup will appear. If the popup does not appear, select Click to enter search criteria.
Step 3. Click the search criteria you are interested in: Single Residential or Residential Condominiums.
Step 4. An alphabetized listing of communities and will be displayed. Click the hyperlinked community to see its community profile.
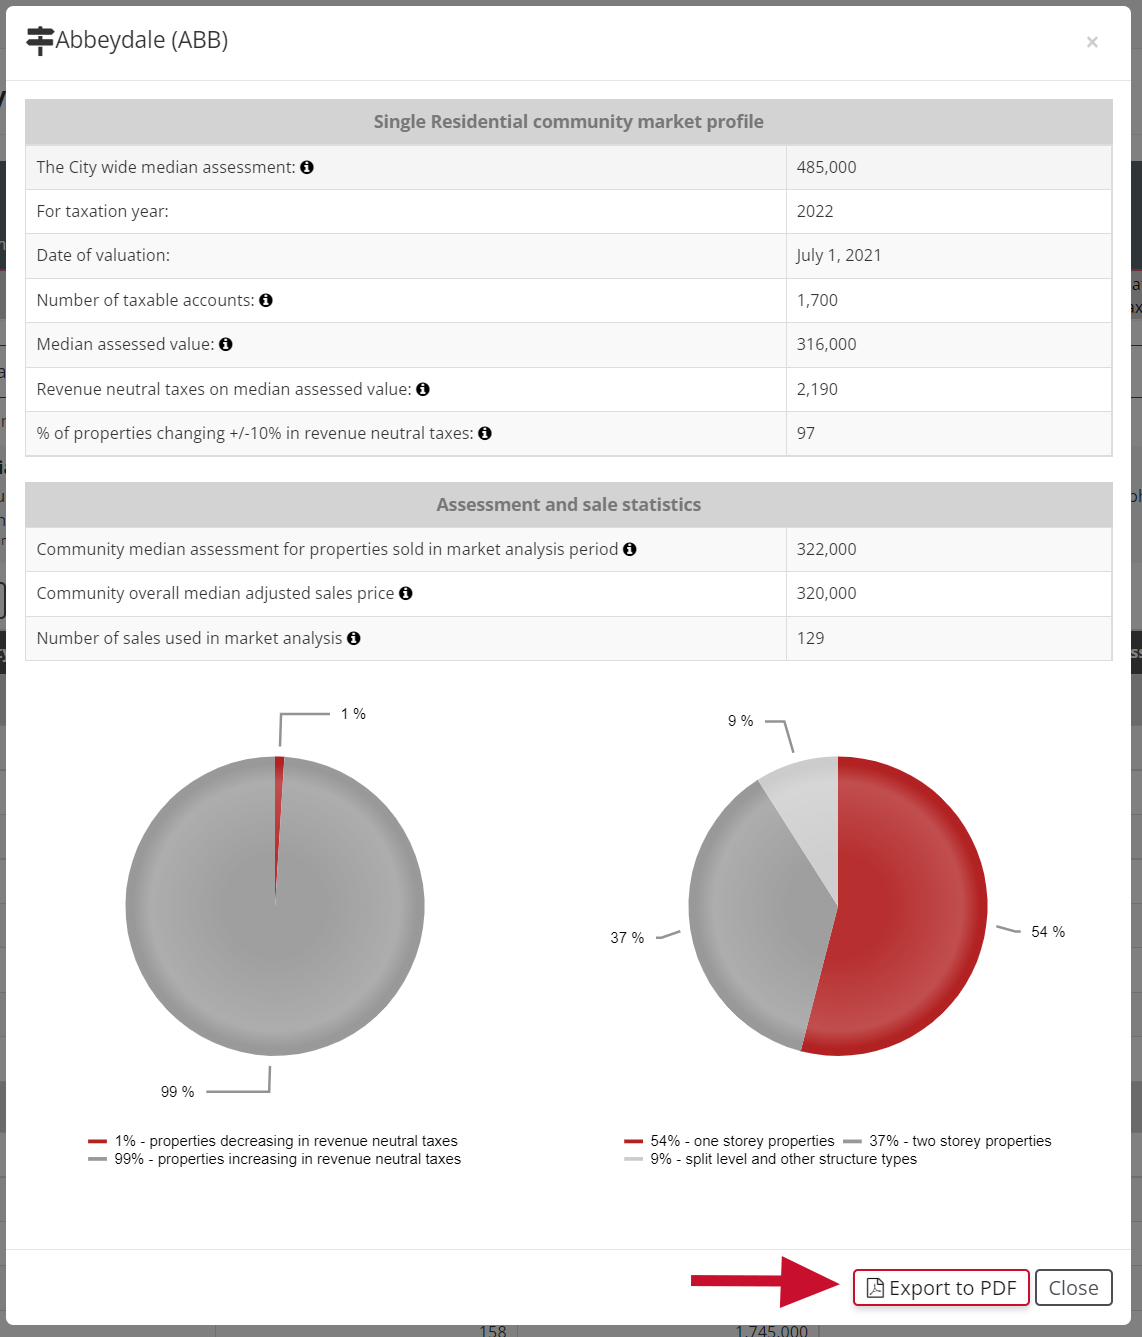
Step 5. A popup of the community profile will appear. You can download the profile by clicking Export to PDF.
The City of Calgary mails property assessment notices in early January each year. A property assessment is a value placed on a property for taxation purposes. It reflects the market value of a property based on the market valuation date of July 1 of the previous year.
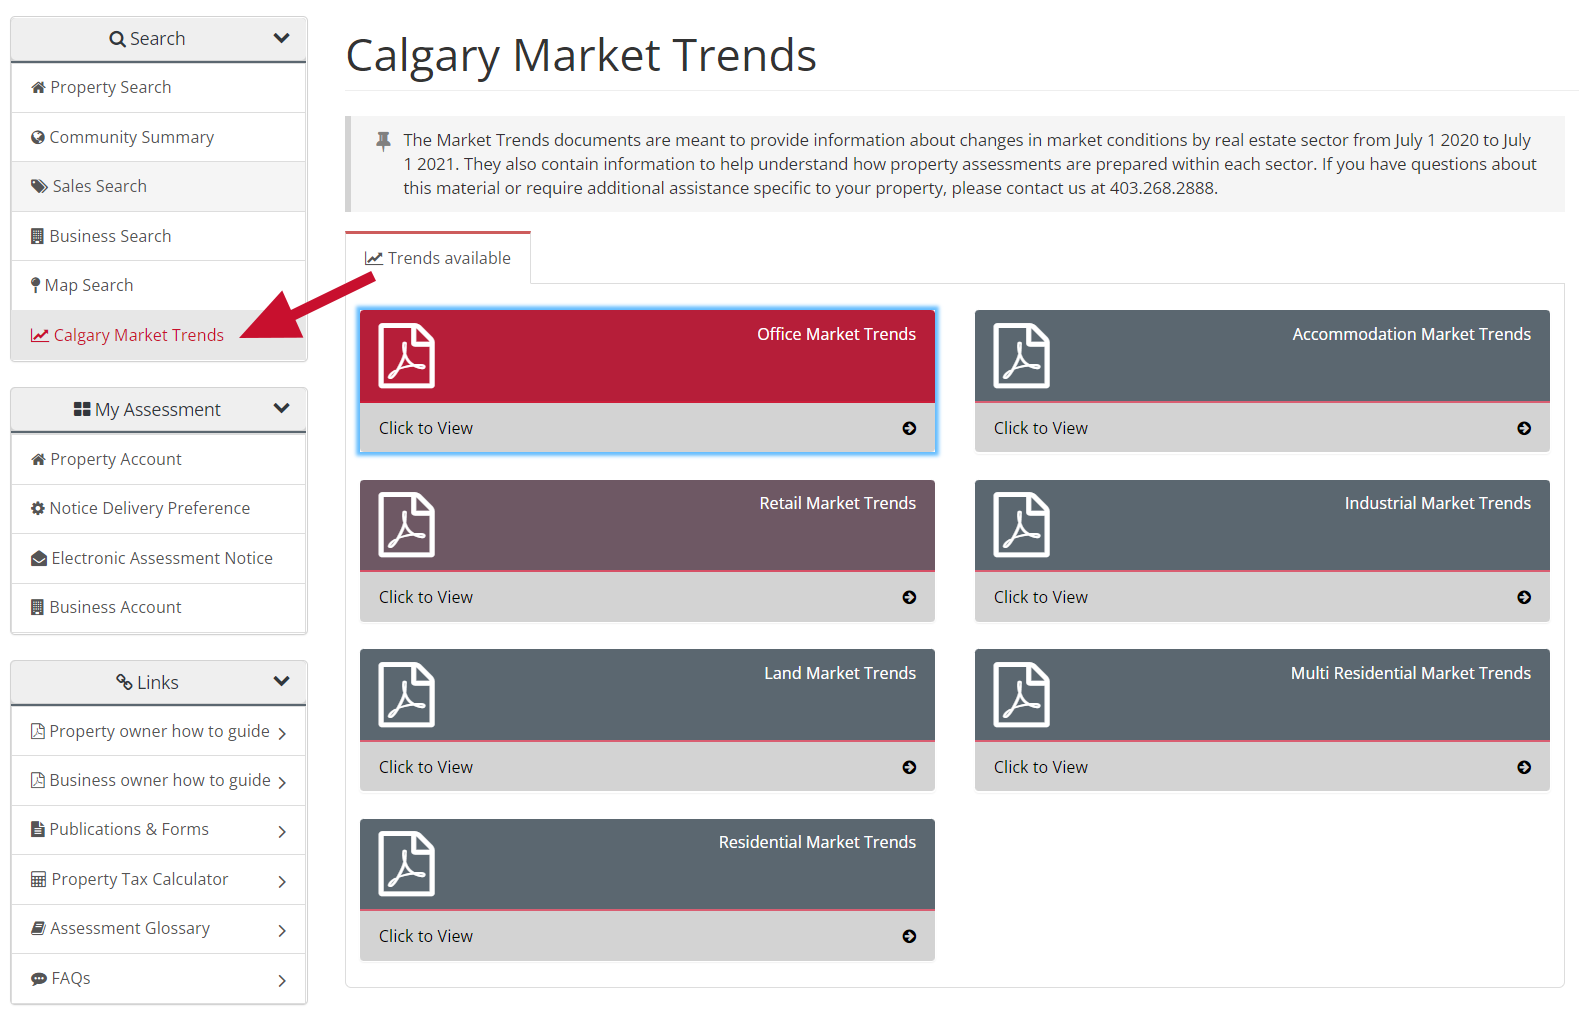
For detailed information on the Calgary market, we encourage you to review the Calgary Market Trend Reports. The Market Trends documents are meant to provide information about changes in market conditions by real estate sector. They also contain information to help understand how property assessments are prepared within each sector.
Step 1. Log into Assessment Search through Secure Access and navigate to the Calgary Market Trends page by clicking on the corresponding button on the left-hand navigation panel. You will be redirected to the Calgary Market Trends page.
Note: If this is your first-time logging into Assessment Search, you will need to register for a myID account and link your property’s roll number to your account. Visit Create your account for step-by-step instructions
Step 2. Select the Market Trends document that you are interested in, which will download the report.
Note: You can also review the Calgary Market Trends reports by visiting Assessment roll highlights.
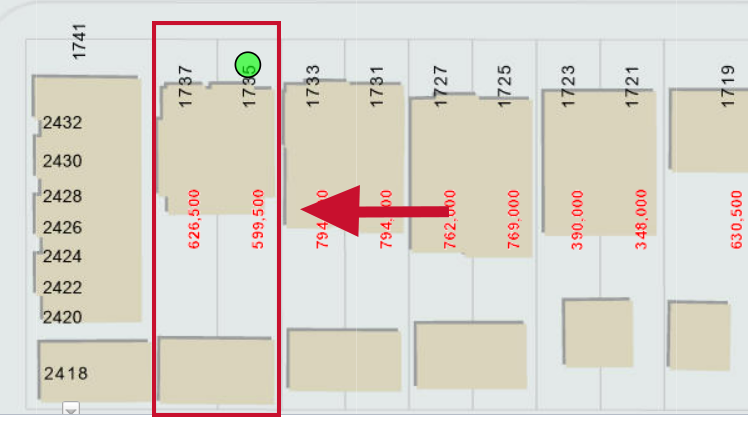
You can view properties on a map using the Map Search function. This can help you easily identify properties in your area, their assessed values, and any sales that occurred during the valuation period.
Compare your property assessment to similar properties (those that have similar characteristics and are in a similar location) to review your market value for fairness and equity. Similarities to look for may include, but are not limited to, location, structure type, size, and influences. While you cannot filter for these similarities within the Map Search tool itself, you can review each property’s characteristics by downloading the Property Summary Report as outlined below.
Step 1. Log into Assessment Search through Secure Access and navigate to the Map Search page by clicking on the corresponding button on the left-hand navigation panel. This will redirect you to a map of Calgary, along with a navigational toolbar.
Note: You will need to have JavaScript enabled on your web browser.
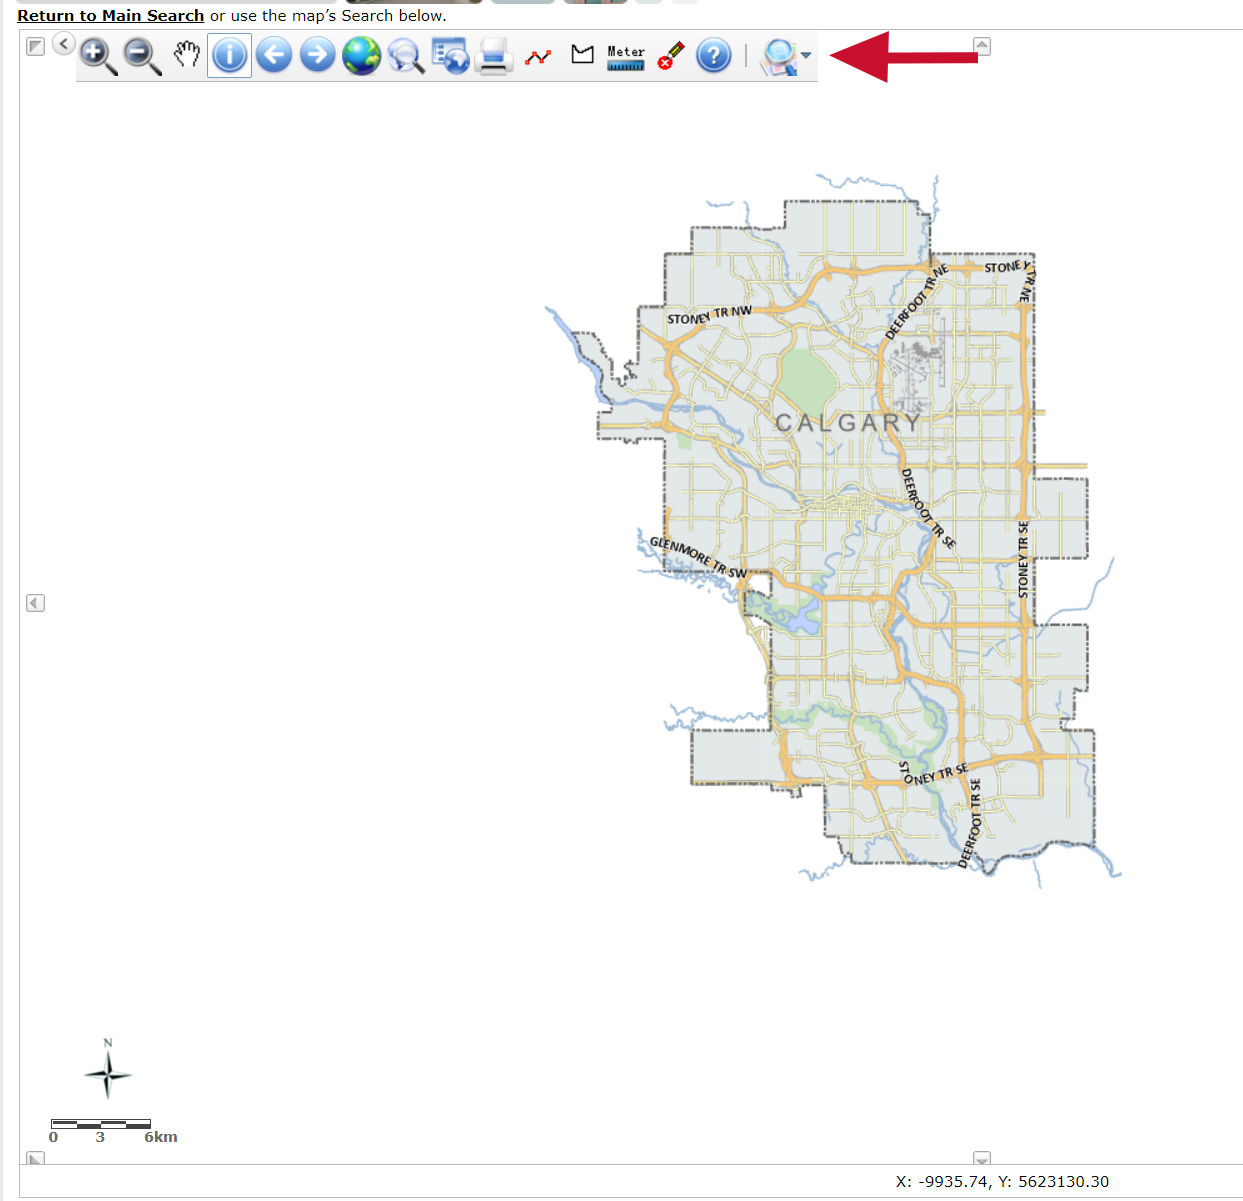
Step 2. Use the navigational toolbar at the top to zoom in/out, view details, print the current map view, and more. Hover over the icons within the toolbar to see what each tool can be used for.
Note: You can access up to 50 Property Summary Reports each year, per roll number. For example, if you have two roll numbers, you can access up to 50 reports per roll number, giving you a combined total of 100 reports. You can request additional report views if needed by completing and submitting this form.
Properties are assessed using mass appraisal. This means that when we determine a property assessment through the sales approach to value, we have reviewed many sales of similar properties in the area as of July 1 the previous year. We use multiple sales to determine an estimate of market value. Use the Sales Search tool to access property sales within Calgary during the most recent valuation period (i.e., the three years of sales preceding July 1 of the year prior to taxation).
Compare your property assessment to sales of similar properties (those that have similar characteristics and are in a similar location) to review your market value for fairness and equity. Similarities to look for may include, but are not limited to, location, structure type, size, and influences. While you cannot filter for these similarities within the Sales Search tool itself, you can review each property’s characteristics by downloading the Property Summary Report as outlined below.
Step 1. Log into Assessment Search through Secure Access and navigate to the Sales Search page by clicking on the corresponding button on the left-hand navigation panel. A popup will appear.
Step 2. You can search sales by property type or residential community summary by using the buttons provided.
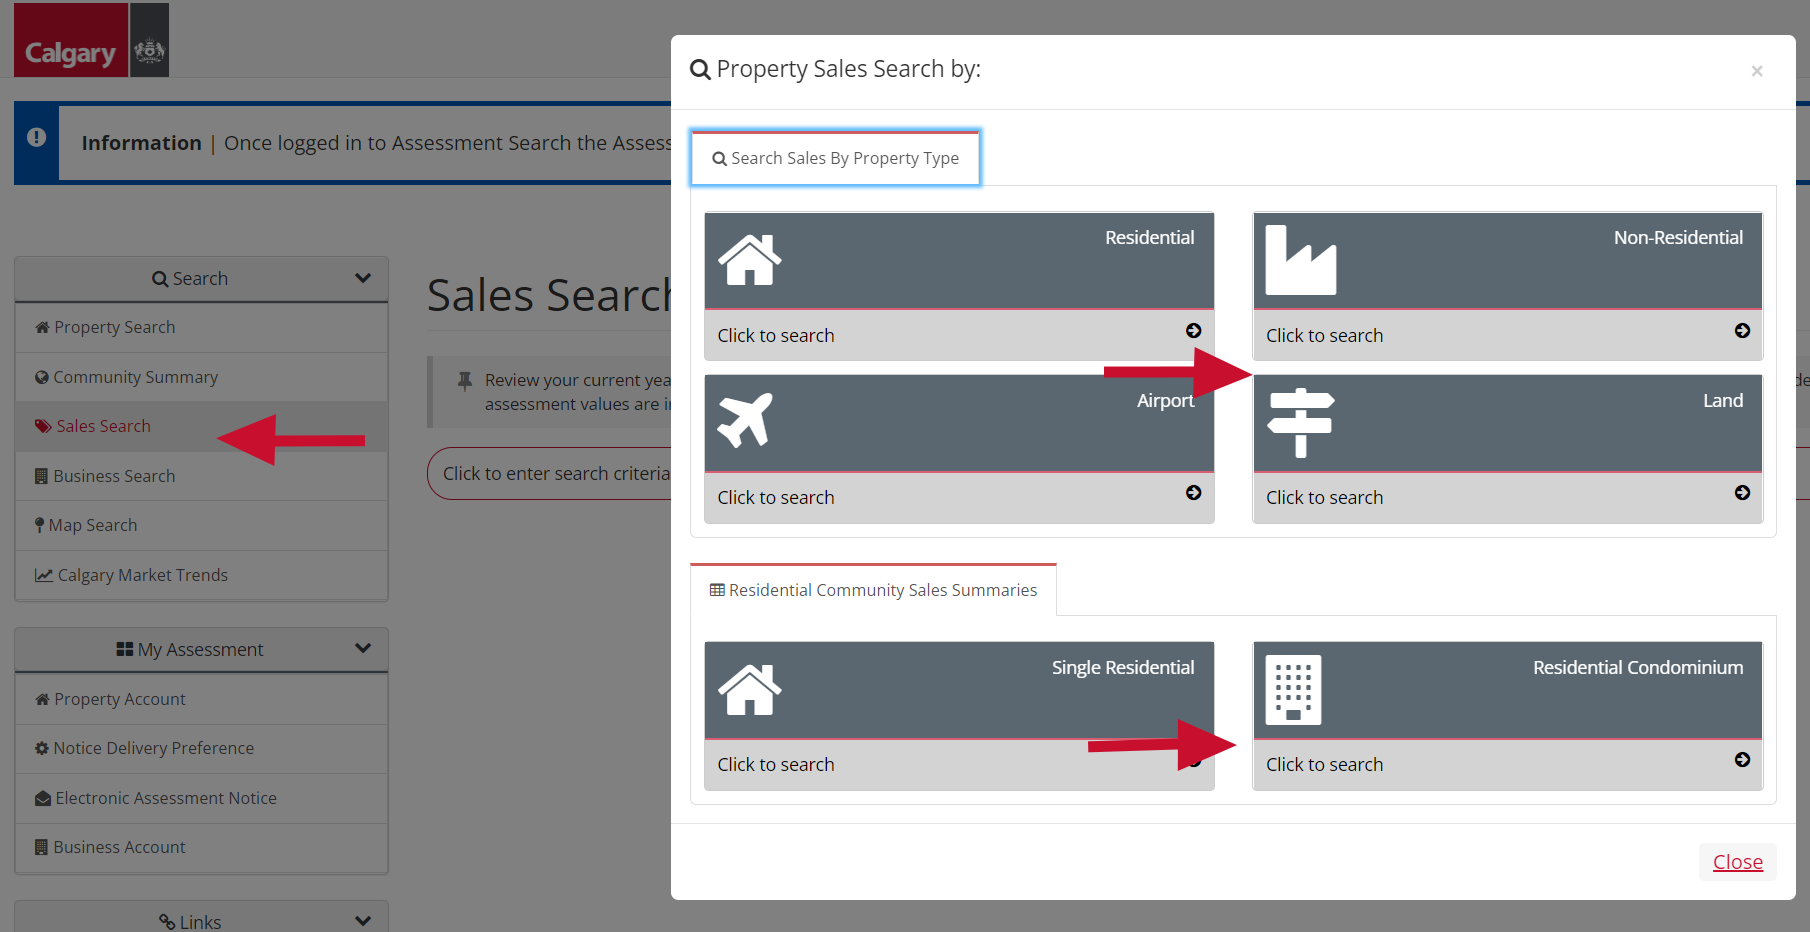
Step 3. Select the type of sales you want to view and enter the criteria you want to search for. You can narrow your search by providing more details. An example of a Property Sales Search using Residential search criteria is shown below.
Note: The Structure Type field in the Residential search does not use the traditional names used for residential properties (e.g., bilevel, 2-storey, etc.), and instead uses levels. Select the number of levels that is most applicable to your search (e.g., 2 level instead of 2-storey).

A listing of sales will be displayed, which includes the property address, sale date, sale price, the adjusted sale price (if applicable), and whether it is part of a portfolio sale. If no sales appear, then there were no applicable sales within your requested parameters.
Note: Only sales that occur within the most recent valuation period will be shown (i.e., the three years of sales preceding July 1 of the year prior to taxation). Sales occurring after July 1 of the year prior to taxation will not be generated as they are outside the valuation period.
Step 4. To see more detailed property information that goes beyond the sale itself, download the Property Summary Report by clicking the hyperlinked address. Alternatively, you can check off the property and select Export to PDF which will download the report. The report includes information such as the year of construction, its square footage and many other characteristics used to prepare the assessment.
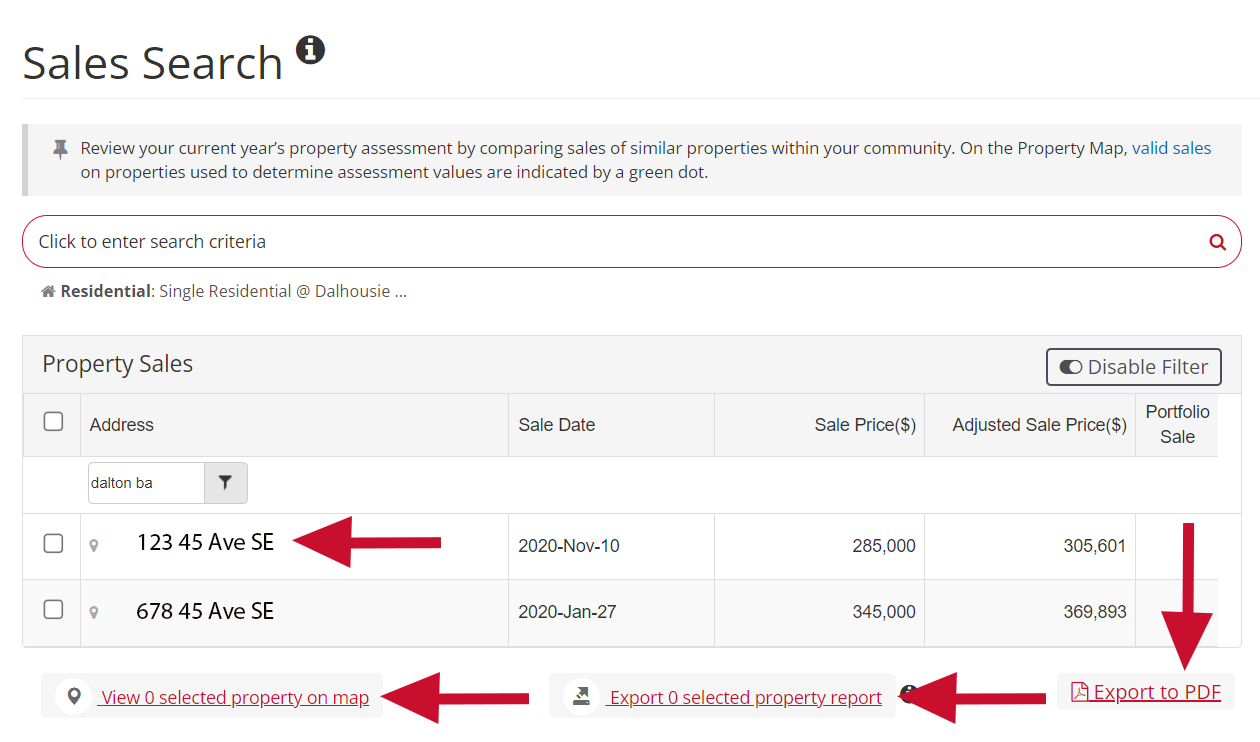
If you would like to view the property sales on a map, check off the properties that you would like included and then click View X selected properties on map. This will redirect you to the Map Search functionality.
If you would like to download the Property Summary Report for multiple properties at one time, check off the properties that interest you and then click Export X selected property reports. The selected Property Summary Report(s) will be downloaded. You can also download individual Property Summary Reports this way.
Note: You can access up to 50 Property Summary Reports each year, per roll number. For example, if you have two roll numbers, you can access up to 50 reports per roll number, giving you a combined total of 100 reports. You can request additional report views if needed by completing and submitting this form.